
Apricot Jam Thumbprint Cookies Recipe – Classic Holiday Cookies
Introduction
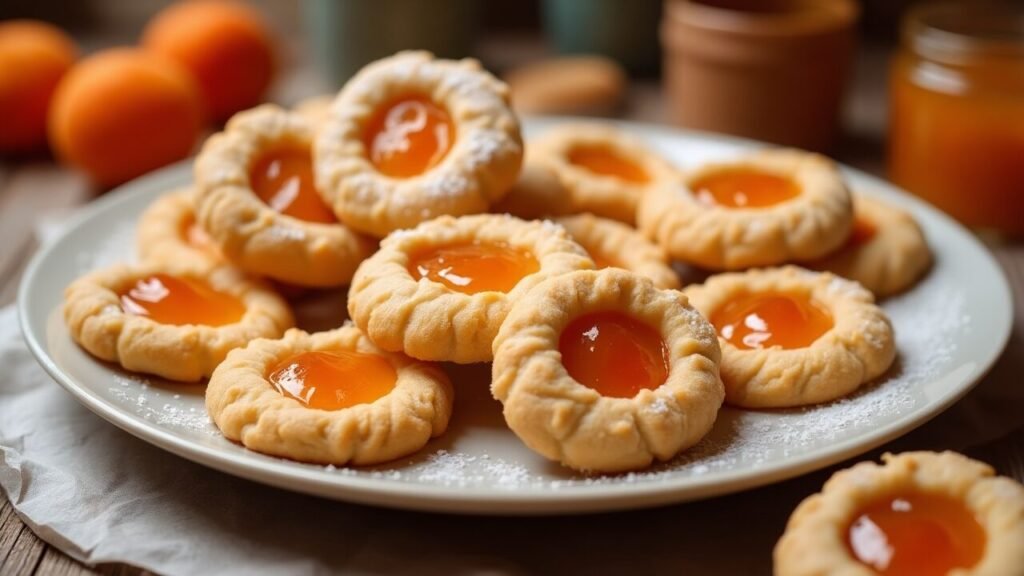
When you want to create cookies that combine the comfort of homemade baking with elegant presentation, nothing delivers quite like classic Apricot Jam Thumbprint Cookies. These aren’t just any cookies – they’re little jewels of buttery perfection with tender, melt-in-your-mouth texture surrounding pools of glossy, sweet apricot jam that create the most delightful contrast of flavors and textures in every bite.
What makes these Thumbprint Cookies absolutely irresistible is their perfect balance of rich, vanilla-scented shortbread-style dough and bright, fruity jam that adds both sweetness and a lovely pop of color. We’re talking about cookies that look as beautiful as they taste, with those characteristic thumb indentations creating the perfect little wells for showcasing gorgeous apricot jam that glistens like edible gems.
The beauty of this classic recipe lies in its simplicity and versatility. Using basic pantry ingredients and a straightforward technique, you can create cookies that look professionally made while allowing for endless customization with different jam flavors and seasonal variations. Plus, they’re perfect for gift-giving, cookie exchanges, and any occasion that calls for something special yet approachable.
In this comprehensive guide, you’ll discover how to create perfect Apricot Jam Thumbprint Cookies that rival those from the finest bakeries. I’ll share my secrets for achieving that ideal tender-yet-structured cookie texture, the best techniques for creating perfectly shaped thumbprints, and professional tips for filling and finishing these delightful treats. Whether you’re an experienced baker or someone looking to master a beloved classic, this recipe delivers consistent, beautiful results every time.
Ingredients Breakdown
Creating the perfect Apricot Jam Thumbprint Cookies requires understanding how each ingredient contributes to the tender texture, rich flavor, and beautiful appearance that makes these cookies so special.
For the Cookie Base:
- 2 1/4 cups all-purpose flour – Provides structure while maintaining the tender, shortbread-like texture. Use the spoon-and-level method for accurate measurement.
- 1/2 teaspoon salt – Enhances all flavors and balances the sweetness perfectly without being detectable.
- 1 cup (2 sticks) unsalted butter, softened – Creates the rich, tender texture and provides the buttery flavor that defines these cookies. Must be properly softened for easy creaming.
- 2/3 cup powdered sugar – Sweetens while contributing to the delicate, melt-in-your-mouth texture. Powdered sugar creates more tender results than granulated.
- 2 large egg yolks – Provides richness and helps bind the dough while contributing to the golden color. Save the whites for another use.
- 1 teaspoon vanilla extract – Adds warmth and depth that complements both the buttery cookie and fruity jam.
- 1/4 teaspoon almond extract – Optional but traditional, adds subtle complexity that pairs beautifully with apricot jam.
For the Jam Filling:
- 1/2 to 3/4 cup high-quality apricot jam or preserves – The star of the show. Choose jam with good fruit content and bright color for best results.
Optional Enhancements:
- Finely chopped toasted almonds – Roll cookies in chopped almonds before baking for extra texture and flavor
- Lemon zest – Add to dough for bright citrus notes that complement apricot
- Powdered sugar for dusting – Light dusting after cooling for elegant presentation
Jam Selection Guide:
- Apricot preserves: Chunky texture with fruit pieces for rustic appeal
- Apricot jam: Smooth consistency for clean, uniform appearance
- Sugar-free options: Work well but may be less glossy
- Homemade jam: Often has the best flavor and color
Alternative Jam Flavors:
- Raspberry jam: Classic alternative with beautiful red color
- Strawberry jam: Sweet and familiar, great for kids
- Peach jam: Similar flavor profile to apricot with lovely color
- Fig jam: Sophisticated option for adult palates
- Orange marmalade: Citrusy brightness with elegant appeal
Step-by-Step Instructions
Step 1: Prepare Your Workspace and Ingredients
Begin by bringing your butter and egg yolks to room temperature – this ensures easy mixing and smooth dough texture. Line baking sheets with parchment paper and preheat your oven to 350°F (175°C). Having everything ready before you start mixing makes the process smooth and efficient.
Room temperature butter should yield to gentle pressure but not be soft or melty. This usually takes about 30-45 minutes at room temperature, or you can speed the process by cutting butter into small pieces.
Step 2: Create the Dry Foundation
In a medium bowl, whisk together the flour and salt until well combined. This ensures even distribution of salt throughout the cookies and prevents any concentrated salty spots. Set aside while you prepare the butter mixture.
Proper mixing of dry ingredients is crucial for consistent texture and flavor throughout all the cookies in your batch.
Step 3: Cream Butter and Sugar to Perfection
In a large mixing bowl, beat the softened butter with an electric mixer until light and fluffy, about 2-3 minutes. Gradually add the powdered sugar and continue beating until the mixture is very light, fluffy, and pale in color – this usually takes another 3-4 minutes.
This creaming process incorporates air into the mixture, creating the tender texture that makes these cookies so special. Don’t rush this step as it’s crucial for proper texture.
Step 4: Add Richness and Flavor
Beat in the egg yolks one at a time, mixing well after each addition. Add the vanilla extract and almond extract (if using), beating until the mixture is smooth and well combined. The mixture should be creamy and homogeneous with no streaks.
Make sure each egg yolk is fully incorporated before adding the next to ensure even mixing and proper texture development.
Step 5: Incorporate Flour for Perfect Dough
With the mixer on low speed, gradually add the flour mixture, mixing just until the dough comes together. Don’t overmix once the flour is added, as this can make the cookies tough instead of tender. The dough should be soft and slightly sticky but hold together when pressed.
Stop mixing as soon as you can’t see streaks of flour. The dough will firm up as it chills, making it easier to handle.
Step 6: Chill for Easy Handling
Wrap the dough in plastic wrap and refrigerate for at least 30 minutes, or until firm enough to roll into balls easily. This chilling step is crucial for preventing the cookies from spreading too much during baking and makes the dough much easier to work with.
While the dough chills, you can prepare your jam by stirring it to ensure smooth consistency. If your jam is very thick, you can thin it slightly with a teaspoon of water.
Step 7: Shape and Create Thumbprints
Roll the chilled dough into 1-inch balls and place them about 2 inches apart on your prepared baking sheets. Using your thumb or the back of a small spoon, make a deep indentation in the center of each cookie, being careful not to crack the edges.
The indentations should be deep enough to hold jam without overflowing but not so deep that they go all the way through the cookie.
Step 8: Fill with Beautiful Jam
Using a small spoon or piping bag, fill each thumbprint with about 1/2 teaspoon of apricot jam. Don’t overfill as the jam will spread slightly during baking. The jam should sit nicely in the depression without overflowing onto the cookie surface.
Bake for 12-15 minutes until the edges are lightly golden but the centers are still pale and soft. The jam should be bubbling slightly and glossy.
Step 9: Cool and Perfect
Let cookies cool on the baking sheet for 5 minutes before transferring to a wire rack. This brief cooling prevents them from breaking while still warm. Once completely cool, you can dust lightly with powdered sugar if desired for an elegant finishing touch.
The cookies will continue to firm up as they cool, developing that perfect tender-yet-structured texture.
Tips and Variations
Expert Tips for Perfect Results:
- Use room temperature ingredients for smooth, even mixing and proper texture
- Don’t overbake – cookies should be pale with just lightly golden edges
- Make thumbprints deep enough to hold jam but not so deep they crack the edges
- Choose high-quality jam for the best flavor and appearance
- Store in airtight containers with parchment between layers to prevent sticking
Delightful Variations to Try:
- Almond Thumbprints: Roll cookies in chopped toasted almonds before baking
- Chocolate Drizzle: Drizzle cooled cookies with melted chocolate for extra elegance
- Lemon Thumbprints: Add lemon zest to dough and use lemon curd instead of jam
- Nutella Centers: Fill with Nutella instead of jam for chocolate lovers
- Seasonal Jams: Use different jam flavors to match seasons and occasions
- Mini Thumbprints: Make smaller cookies for elegant tea service or large batches
Serving Suggestions
These beautiful Apricot Jam Thumbprint Cookies are perfect on their own, but here are ways to present them for maximum impact and enjoyment:
Elegant Tea Service:
- Arrange on tiered serving stands with other delicate cookies and pastries
- Serve with fine china and proper tea service for afternoon elegance
- Dust lightly with powdered sugar just before serving for sophisticated presentation
- Pair with Earl Grey or chamomile tea for complementary flavors
Holiday and Gift Presentations:
- Package in decorative tins with parchment paper layers for beautiful homemade gifts
- Create cookie platters with various thumbprint flavors for holiday entertaining
- Add to cookie exchange contributions – they’re always crowd favorites
- Present in clear cellophane bags tied with ribbons for party favors
Special Occasion Service:
- Include in dessert buffets alongside other elegant sweets
- Serve at bridal showers and baby showers for delicate, feminine appeal
- Create wedding favors by packaging individual cookies in small boxes
- Add to anniversary celebrations for romantic, nostalgic charm
Casual Family Enjoyment:
- Keep in cookie jars for everyday treats with coffee or milk
- Pack in lunch boxes for special surprises
- Serve with ice cream for simple but elegant desserts
- Enjoy with morning coffee as a not-too-sweet breakfast treat
Storage and Reheating Instructions
Room Temperature Storage: Store Apricot Jam Thumbprint Cookies in airtight containers at room temperature for up to 1 week. Layer between parchment paper to prevent the jam from sticking to other cookies. The cookies actually improve slightly after a day as flavors meld together.
Longer-Term Storage: These cookies keep beautifully in the refrigerator for up to 2 weeks when properly stored in airtight containers. Bring to room temperature before serving for the best texture and flavor. The jam may firm up when cold but softens quickly at room temperature.
Freezing Options: Unbaked cookie dough balls can be frozen on baking sheets, then transferred to freezer bags for up to 3 months. Bake directly from frozen, adding 1-2 extra minutes to the baking time. Baked cookies can be frozen for up to 2 months, though the jam texture may change slightly.
Gift Storage: For gift-giving, these cookies travel well when properly packaged. Use rigid containers to prevent crushing and include parchment paper between layers. Include storage instructions with your gift to ensure recipients enjoy them at their best.
Quality Maintenance: Store in cool, dry places away from heat and humidity. The jam centers can become sticky in humid conditions, so airtight storage is particularly important for maintaining the perfect texture contrast.
Recipe Notes
Butter Temperature: Properly softened butter is crucial for the right texture. It should yield to gentle pressure but not be melty. If it’s too soft, the cookies will spread too much; too hard, and the dough won’t come together properly.
Jam Selection: Choose jam or preserves with good fruit content and bright color. Avoid very chunky preserves as they don’t nestle well in the thumbprints. If your jam is too thick, thin it slightly with water for easier filling.
Thumbprint Technique: Make thumbprints immediately after shaping balls, while the dough is still workable. If the dough cracks around the edges, it’s too cold – let it warm up slightly before continuing.
Baking Doneness: These cookies should be pale with just lightly golden edges. Overbaking makes them hard instead of tender. The jam should be bubbling slightly when done.
Make-Ahead Options: Cookie dough can be made up to 2 days ahead and refrigerated, or shaped cookies can be frozen before baking. This makes them perfect for advance holiday preparation.
Nutrition Information (Per Serving)
Serves: 30
| Nutrient | Amount per Serving |
|---|---|
| Calories | 95 |
| Total Fat | 6g |
| Saturated Fat | 4g |
| Cholesterol | 25mg |
| Sodium | 45mg |
| Total Carbohydrates | 12g |
| Dietary Fiber | 0.5g |
| Total Sugars | 6g |
| Added Sugars | 5g |
| Protein | 1g |
| Calcium | 15mg |
| Iron | 0.6mg |
| Potassium | 25mg |
Nutrition information is an estimate and may vary based on specific ingredients and jam used.
Recipe Card Summary
Course: Dessert/Cookie
Cuisine: American/European
Servings: 30
Prep Time: 20 minutes
Chill Time: 30 minutes
Bake Time: 12-15 minutes per batch
Total Time: 1 hour 30 minutes
Ingredients:
- 2 1/4 cups all-purpose flour
- 1/2 teaspoon salt
- 1 cup unsalted butter, softened
- 2/3 cup powdered sugar
- 2 large egg yolks
- 1 teaspoon vanilla extract
- 1/4 teaspoon almond extract (optional)
- 1/2 to 3/4 cup apricot jam
Instructions:
- Mix flour and salt in medium bowl
- Cream butter until fluffy, add powdered sugar
- Beat in egg yolks, vanilla, and almond extract
- Add flour mixture until just combined
- Chill dough 30 minutes
- Roll into balls, make thumbprints
- Fill with jam, bake at 350°F for 12-15 minutes
- Cool on baking sheet 5 minutes, then transfer to wire rack
Notes: Don’t overbake – cookies should be pale with lightly golden edges. Store in airtight containers up to 1 week.
Diet Tags: Vegetarian
Health Benefits:
- Moderate portion size supports mindful eating
- Contains vitamin C from fruit jam
- Provides energy from natural fruit sugars
- Can be made with sugar-free jam for reduced sugar option
Frequently Asked Questions
1. Why do my thumbprints crack when I make the indentation? This usually happens when the dough is too cold and firm, or when pressing too hard or fast. Let chilled dough warm up for 5-10 minutes before shaping, and press gently but firmly to create the indentation. If cracks appear, gently smooth them with your finger.
2. Can I use different types of jam in the same batch? Absolutely! Using different jam flavors creates beautiful variety and allows everyone to choose their favorite. Just make sure all jams have similar consistency for even baking. Consider using complementary flavors like apricot, raspberry, and peach.
3. How do I prevent the jam from bubbling over during baking? Don’t overfill the thumbprints – about 1/2 teaspoon is perfect. If your jam is very thin, let it sit at room temperature to thicken slightly, or choose a thicker jam or preserves. The jam should sit in the depression without overflowing.
4. My cookies spread too much during baking. What went wrong? Excessive spreading usually means the butter was too soft, the dough wasn’t chilled enough, or the oven temperature was too low. Make sure butter is properly softened (not melty), chill the dough adequately, and verify your oven temperature with a thermometer.
5. Can I make these cookies ahead for a special event? Yes! These cookies are perfect make-ahead treats. Bake them up to 3 days ahead and store in airtight containers. You can also freeze the shaped, unbaked cookies and bake them directly from frozen when needed, adding a minute or two to the baking time.
Final Thoughts
There’s something absolutely delightful about Apricot Jam Thumbprint Cookies that goes beyond their obvious visual appeal – they represent the perfect marriage of technique and tradition, creating treats that feel both nostalgic and elegant. These cookies embody everything I love about classic baking: simple ingredients transformed through careful technique into something that brings joy and satisfaction with every bite.
What makes this recipe particularly special is how it teaches fundamental cookie-making skills while producing results that look professionally made. The tender, buttery dough provides the perfect canvas for showcasing beautiful jam centers, creating cookies that are as much a feast for the eyes as they are for the palate.
These Thumbprint Cookies have earned a permanent place in my baking repertoire, equally at home in everyday cookie jars and elegant gift boxes. They’re the kind of cookies that create connections – whether you’re making them with children who love pressing their thumbs into the dough, or presenting them as thoughtful gifts that show someone you care enough to make something beautiful by hand.
I’d love to hear about your thumbprint cookie adventures! What jam flavors did you choose? Did you try any of the creative variations? How did your family and friends react to these beautiful, buttery treats? Share your photos and stories in the comments below – there’s nothing I enjoy more than seeing how you make these classic recipes your own and hearing about the special moments they help create. Here’s to the simple pleasure of homemade cookies and the joy of sharing something made with love!