
Perfect Homemade Blackberry Pie Recipe
Introduction
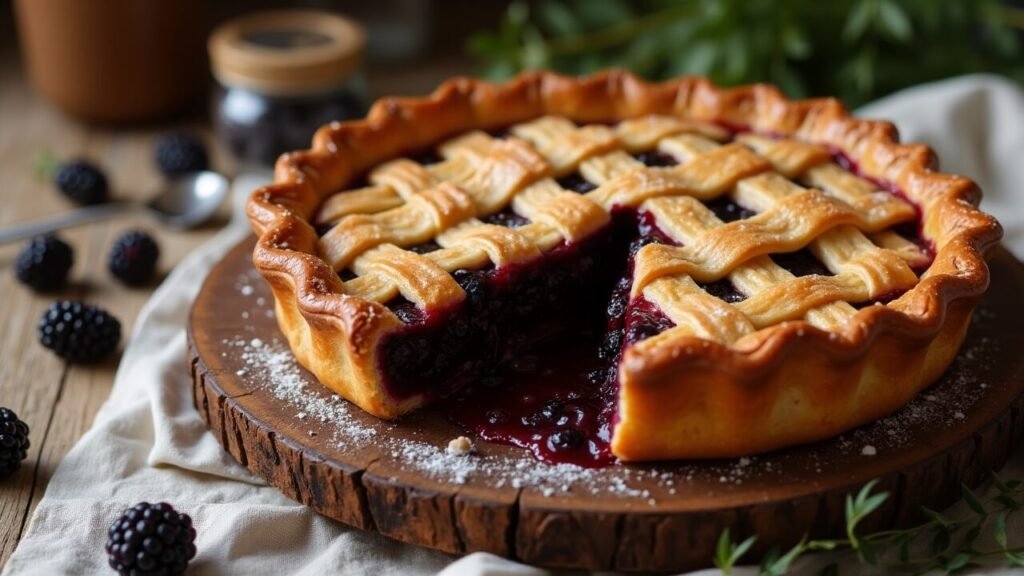
Experience the quintessential taste of summer with this perfect Homemade Blackberry Pie that captures the essence of ripe, juicy blackberries in a flaky, golden crust that melts in your mouth. This classic American dessert represents the pinnacle of fruit pie perfection, combining sweet-tart blackberries with just the right amount of sugar and spices, all nestled within a buttery, tender pastry that showcases the natural beauty and intense flavor of peak-season berries.
What makes this blackberry pie truly exceptional is its perfect balance of sweet and tart flavors that allows the natural blackberry taste to shine without being overpowered by excessive sugar or competing flavors. The filling achieves that ideal consistency where the berries hold their shape while creating just enough syrupy goodness to bind everything together, while the double crust provides both structural integrity and textural contrast that makes each bite a perfect harmony of flavors and textures.
This recipe represents generations of pie-making wisdom distilled into foolproof techniques that ensure success even for novice bakers. The carefully balanced filling prevents the common pitfalls of runny or overly thick pie filling, while the proven pastry method creates consistently flaky, tender crust that never becomes soggy or tough. Every element has been optimized to work together harmoniously for bakery-quality results in your home kitchen.
The beauty of homemade blackberry pie extends far beyond its incredible taste to encompass the therapeutic ritual of pie-making itself. From rolling out pastry to arranging the perfect lattice top, creating this pie provides a meditative connection to traditional baking methods that brings satisfaction and accomplishment alongside the delicious end result. The process creates anticipation and fills your kitchen with aromas that embody the essence of home baking at its finest.
In this comprehensive guide, you’ll master every aspect of perfect blackberry pie creation, from selecting the ideal berries and achieving flaky pastry to creating beautiful lattice tops and preventing common baking mishaps. We’ll cover make-ahead strategies, storage techniques, and serving suggestions that will make your blackberry pie the centerpiece of memorable meals and cherished family gatherings.
Ingredients Breakdown
Perfect Pie Crust Foundation:
All-Purpose Flour (2 1/2 cups) – Forms the structural foundation of flaky pastry. Use unbleached flour for best flavor and texture, measuring accurately by spooning and leveling for consistent results.
Unsalted Butter (1 cup, cold) – Creates the flaky layers through proper fat distribution. Keep butter very cold and cut into small cubes just before using for optimal pastry texture.
Vegetable Shortening (1/4 cup, cold) – Adds tenderness and helps create an even more flaky texture when combined with butter. The combination of fats creates superior pastry structure.
Ice Water (6-8 tablespoons) – Brings dough together without developing tough gluten. Use only as much as needed and keep water ice-cold for best results.
Salt (1 teaspoon) – Enhances flavor and strengthens gluten structure for workable dough that handles well during rolling and shaping.
Sugar (1 tablespoon) – Adds subtle sweetness and helps create golden browning during baking while tenderizing the pastry slightly.
Blackberry Filling Perfection:
Fresh Blackberries (6 cups) – The star ingredient that should be ripe but still firm for best texture and flavor balance. Choose berries that are deeply colored and fragrant.
Granulated Sugar (3/4 cup) – Sweetens tart berries while drawing out natural juices to create syrupy binding. Adjust amount based on berry ripeness and sweetness preference.
Cornstarch (1/3 cup) – Thickens berry juices to perfect consistency that holds together when sliced but isn’t gummy or stiff. Superior to flour for fruit pies.
Lemon Juice (2 tablespoons) – Brightens flavor and balances sweetness while preventing berries from becoming too soft during baking.
Lemon Zest (1 teaspoon) – Adds aromatic citrus notes that enhance berry flavor without competing with the natural blackberry taste.
Vanilla Extract (1 teaspoon) – Deepens and rounds out flavor profile while adding aromatic complexity that makes the pie more sophisticated.
Salt (1/4 teaspoon) – Enhances all other flavors and balances sweetness for more complex, satisfying taste experience.
Optional Flavor Enhancements:
Cinnamon (1/2 teaspoon) – Adds warm spice that complements blackberries beautifully, especially for autumn serving occasions.
Nutmeg (1/4 teaspoon) – Provides subtle warming spice that enhances berry flavor without overpowering the natural fruit taste.
Almond Extract (1/4 teaspoon) – Adds sophisticated flavor depth that pairs naturally with blackberries and stone fruits.
Orange Zest (1 teaspoon) – Alternative citrus option that provides different aromatic profile while still brightening berry flavors.
Lattice and Finishing Elements:
Egg Wash (1 egg + 1 tablespoon cream) – Creates golden, glossy finish on crust that looks professional and appetizing.
Coarse Sugar (2 tablespoons) – Sprinkled over lattice creates sparkly, bakery-style appearance and adds textural interest.
Butter (2 tablespoons, diced) – Dotted over filling before adding top crust, adds richness and helps create syrupy consistency.
Alternative Berry Options:
Frozen Blackberries (6 cups) – Acceptable substitute when fresh aren’t available, though texture will be softer. Don’t thaw before using.
Mixed Berry Combination – Combine blackberries with raspberries, blueberries, or marionberries for complex flavor profiles.
Wild Blackberries – If available, provide more intense flavor and firmer texture than cultivated varieties.
Crust Variation Ingredients:
Whole Wheat Pastry Flour (1 cup) – Replace portion of all-purpose flour for nuttier flavor and added nutrition.
Cream Cheese (2 oz, cold) – Added to pastry creates extra tender, flaky texture with subtle tangy flavor.
Vodka (2 tablespoons) – Replace some water with vodka for easier rolling and more tender crust texture.
Step-by-Step Instructions
1. Create Perfect Pie Pastry
In large bowl, whisk together flour, salt, and sugar until evenly combined. Add cold, cubed butter and shortening, using pastry cutter or fingertips to work fats into flour until mixture resembles coarse crumbs with some pea-sized butter pieces remaining.
Sprinkle ice water over mixture, 2 tablespoons at a time, tossing gently with fork until dough begins to come together. Use only as much water as needed – dough should hold together when squeezed but not be wet or sticky.
Divide dough into two portions (one slightly larger for bottom crust), shape into discs, wrap in plastic, and refrigerate at least 1 hour before rolling. This rest period ensures tender, workable pastry.
2. Prepare Perfect Berry Filling
In large bowl, gently combine blackberries with sugar, cornstarch, lemon juice, lemon zest, vanilla, and salt. Toss carefully to avoid crushing berries while ensuring even coating of all ingredients.
Let mixture stand 15 minutes to allow berries to release juices and cornstarch to begin dissolving. This maceration process helps create proper filling consistency and prevents gummy texture.
Taste and adjust sweetness if needed, remembering that berries will taste less sweet when baked, so err on the side of slightly sweeter than desired.
3. Roll and Shape Bottom Crust
Remove larger pastry disc from refrigerator and let soften slightly for easier rolling. On lightly floured surface, roll pastry from center outward into 12-inch circle, rotating frequently to maintain round shape.
Transfer carefully to 9-inch pie plate by rolling around rolling pin or folding in quarters. Gently press into bottom and sides without stretching, leaving 1-inch overhang for proper edge formation.
Trim excess pastry and crimp edges decoratively or leave plain for lattice top application. Refrigerate prepared shell while preparing lattice top.
4. Create Beautiful Lattice Top
Roll remaining pastry disc into 11-inch circle and cut into 1-inch strips using sharp knife or pastry wheel. Aim for 10-12 strips of varying lengths for complete lattice coverage.
Arrange longest strips vertically over filled pie, spacing evenly. Fold back every other strip halfway, place horizontal strip across center, then unfold vertical strips over it.
Continue weaving pattern by folding back opposite strips and placing horizontal strips, creating classic over-under lattice pattern that’s both beautiful and functional.
5. Assemble Your Masterpiece
Pour prepared berry filling into chilled pie shell, mounding slightly in center as fruit will settle during baking. Dot with small pieces of butter for added richness and moisture.
Complete lattice weaving, then trim strip ends to 1-inch overhang. Fold lattice ends under bottom crust edge and crimp decoratively to seal completely and prevent juice leakage.
Brush lattice with egg wash and sprinkle with coarse sugar for golden, bakery-style finish that adds visual appeal and textural contrast.
6. Bake to Golden Perfection
Preheat oven to 425°F with rack in lower third position. Place pie on baking sheet to catch potential drips and bake 20 minutes at high temperature for initial crust setting.
Reduce temperature to 375°F and continue baking 35-45 minutes until crust is deep golden brown and filling bubbles vigorously through lattice openings.
If edges brown too quickly, cover with foil strips or pie shield. Pie is done when juices are thick and bubbly and crust sounds hollow when tapped.
7. Cool for Perfect Slicing
Cool completely on wire rack for at least 4 hours before cutting. This cooling time allows filling to set properly for clean slices that hold their shape beautifully.
The pie will seem underdone when hot, but proper cooling creates the perfect gel-like consistency that makes each slice perfect. Resist the urge to cut too early for best results.
Store covered at room temperature up to 2 days, or refrigerate for longer storage while maintaining optimal texture and flavor.
Tips and Variations
Professional Pie-Making Techniques:
Temperature Control – Keep all ingredients cold and work in cool kitchen when possible. Warm conditions make pastry difficult to handle and less flaky.
Gentle Handling – Mix pastry just until it comes together and handle minimally to prevent tough crust development from overworked gluten.
Even Rolling – Roll pastry from center outward, rotating frequently and using minimal flour to prevent sticking without making pastry tough.
Proper Crimping – Seal edges thoroughly to prevent juice leakage, using decorative crimping for professional appearance and functional seal.
Creative Flavor Variations:
Spiced Blackberry – Add cinnamon, nutmeg, and cardamom for warming spices that complement fall serving occasions perfectly.
Lemon Blackberry – Increase lemon zest to 2 teaspoons and add 1 tablespoon lemon juice for brighter, more citrusy profile.
Almond Blackberry – Include 1/2 teaspoon almond extract and sprinkle sliced almonds over lattice for sophisticated flavor and texture.
Blackberry Peach – Replace 2 cups blackberries with sliced peaches for fruit combination that balances tart and sweet beautifully.
Advanced Crust Techniques:
Blind Baking Prevention – Use pie weights or dried beans when pre-baking crusts to prevent puffing and shrinkage during baking.
Steam Vents – Create decorative steam vents in solid top crusts to prevent filling from boiling over during baking.
Egg Wash Variations – Use cream instead of water in egg wash for richer color, or brush with milk for lighter golden finish.
Sugar Finishes – Try different sugars like turbinado or pearl sugar for varied textures and visual appeal on finished crust.
Seasonal Adaptations:
Summer Fresh – Use peak-season berries at room temperature for maximum flavor and ideal texture in finished pie.
Winter Comfort – Add warming spices and serve with vanilla ice cream for cozy cold-weather dessert that brings summer memories.
Holiday Special – Create decorative pastry cutouts for special occasions, using themed shapes appropriate to the celebration.
Make-Ahead Strategies:
Pastry can be made 3 days ahead and refrigerated, or frozen up to 3 months. Assembled unbaked pie can be frozen up to 1 month and baked directly from frozen with extended time.
Serving Suggestions
Classic Accompaniments:
Vanilla Ice Cream – The traditional pairing that provides cool, creamy contrast to warm, tart-sweet pie filling and buttery crust.
Fresh Whipped Cream – Lightly sweetened whipped cream adds luxury and balances the intense berry flavor with its mild richness.
Sharp Cheddar Cheese – Traditional American pairing that provides savory contrast and rich flavor that complements fruit sweetness surprisingly well.
Crème Fraîche – Sophisticated alternative to whipped cream that adds tangy richness and European flair to classic American dessert.
Seasonal Serving Ideas:
Summer Picnic – Serve at room temperature with mason jar drinks and checkered tablecloths for authentic outdoor dining experience.
Fall Harvest – Warm slightly and serve with spiced cider or coffee for cozy autumn dessert that celebrates seasonal abundance.
Holiday Celebration – Present on special china with formal table setting for elegant holiday dessert that honors traditional American baking.
Casual Family Dinner – Cut generous slices and serve on everyday plates with cold milk for comfortable, satisfying weeknight dessert.
Presentation Enhancements:
Individual Portions – Make mini pies in ramekins for elegant individual servings perfect for dinner parties or special occasions.
Rustic Charm – Serve directly from pie plate on wooden boards with vintage utensils for authentic farmhouse presentation style.
Elegant Plating – Serve plated portions with artistic drizzles of berry coulis and mint garnish for restaurant-quality presentation.
Beverage Pairings:
Coffee and black tea complement the rich pastry, while dessert wines like Port or late-harvest Riesling enhance berry flavors beautifully.
Leftover Ideas:
Crumble leftover pie over yogurt for breakfast, or warm and serve over vanilla ice cream for quick dessert that transforms leftovers into treats.
Storage and Reheating Instructions
Room Temperature Storage:
Store covered pie at room temperature up to 2 days for optimal texture and flavor. Cover loosely with foil or plastic wrap to prevent moisture loss while allowing air circulation.
Keep in cool, dry location away from direct sunlight or heat sources that could cause filling to spoil or crust to become soggy.
Refrigeration Guidelines:
For storage beyond 2 days, refrigerate covered pie up to 5 days. The crust will lose some crispness but flavor remains excellent throughout storage period.
Allow refrigerated pie to come to room temperature for 30 minutes before serving, or warm gently in low oven to restore optimal texture and temperature.
Freezing Instructions:
Baked Pie – Freeze completely cooled pie tightly wrapped for up to 4 months. Thaw overnight in refrigerator before serving.
Unbaked Pie – Freeze assembled unbaked pie up to 3 months. Bake directly from frozen, adding 15-20 minutes to normal baking time.
Pastry Components – Freeze wrapped pastry discs up to 3 months for convenient pie-making when fresh berries are available.
Reheating Methods:
Whole Pie – Warm in 350°F oven for 15-20 minutes until crust crisps and filling warms through without becoming too hot.
Individual Slices – Microwave 30-60 seconds or warm in toaster oven for crispy crust texture restoration.
From Frozen – Thaw overnight, then warm gently in low oven to restore optimal serving temperature and texture.
Quality Maintenance:
Properly stored pie maintains excellent flavor throughout recommended storage periods, though crust texture is best within first 2 days of baking.
Signs of Spoilage:
Discard pie if filling shows signs of mold, off odors develop, or crust becomes excessively soggy beyond normal storage softening.
Recipe Notes
Critical Success Factors:
Berry Selection – Choose ripe but firm berries that hold their shape during baking while providing optimal flavor balance.
Pastry Temperature – Keep ingredients cold and work quickly to maintain proper fat distribution for maximum flakiness.
Thickening Balance – Use proper cornstarch ratio to achieve filling that sets without becoming gummy or remaining too liquid.
Baking Doneness – Ensure filling bubbles vigorously and crust is deep golden for proper doneness and food safety.
Equipment Recommendations:
9-inch Pie Plate – Glass or ceramic pie plates provide even browning and allow visual monitoring of bottom crust doneness.
Pastry Cutter – Essential for properly incorporating fats into flour for optimal pastry texture and flakiness.
Rolling Pin – Heavy rolling pin with smooth surface creates even pastry thickness and professional-quality results.
Pie Shield – Protects crust edges from over-browning during extended baking time required for proper filling doneness.
Timing for Perfect Results:
Day Before – Make pastry and refrigerate overnight for easier handling and improved flavor development.
Morning Of – Assemble pie and refrigerate until ready to bake for stress-free timing and optimal results.
Baking Day – Allow 6 hours total time including cooling for properly set pie ready for perfect slicing and serving.
Quality Control Standards:
Even Thickness – Roll pastry to consistent 1/8-inch thickness for even baking and professional appearance.
Sealed Edges – Crimp thoroughly to prevent filling leakage that can cause soggy bottom crust and messy oven.
Proper Ventilation – Ensure adequate steam vents in lattice or solid crust to prevent filling overflow during baking.
Troubleshooting Common Issues:
Soggy Bottom – Pre-bake bottom crust 10 minutes before adding filling, or place pie on lower oven rack for direct bottom heat.
Runny Filling – Increase cornstarch by 1 tablespoon or cool completely before cutting to allow proper setting.
Tough Crust – Use less water, handle dough minimally, and ensure fats remain cold throughout preparation process.
Burnt Edges – Cover edges with foil strips or pie shield if browning too quickly during extended baking time.
Nutrition Information (Per Serving)
| Nutrient | Amount |
|---|---|
| Calories | 385 |
| Total Fat | 16g |
| Saturated Fat | 8g |
| Carbohydrates | 58g |
| Sugar | 32g |
| Fiber | 6g |
| Protein | 5g |
| Sodium | 285mg |
| Cholesterol | 35mg |
| Calcium | 45mg |
| Iron | 2mg |
Nutrition information is an estimate based on 8 servings and may vary based on specific ingredients and preparation methods used.
Recipe Card Summary
Course: Dessert
Cuisine: American
Servings: 8
Prep Time: 45 minutes
Cook Time: 65 minutes
Total Time: 1 hour 50 minutes (plus cooling time)
Ingredients:
Pie Crust:
- 2 1/2 cups all-purpose flour
- 1 cup cold unsalted butter, cubed
- 1/4 cup cold vegetable shortening
- 1 teaspoon salt
- 1 tablespoon sugar
- 6-8 tablespoons ice water
Blackberry Filling:
- 6 cups fresh blackberries
- 3/4 cup granulated sugar
- 1/3 cup cornstarch
- 2 tablespoons lemon juice
- 1 teaspoon lemon zest
- 1 teaspoon vanilla extract
- 1/4 teaspoon salt
- 2 tablespoons butter, diced
For Finishing:
- 1 egg + 1 tablespoon cream (egg wash)
- 2 tablespoons coarse sugar
Instructions:
- Make pastry by cutting fats into flour mixture, add ice water gradually.
- Divide into two discs, wrap and chill 1 hour minimum.
- Combine berries with sugar, cornstarch, lemon juice, zest, vanilla, and salt.
- Roll bottom crust, place in pie plate, trim and crimp edges.
- Add filling, dot with butter pieces.
- Create lattice top with remaining pastry strips.
- Brush with egg wash, sprinkle with coarse sugar.
- Bake 425°F for 20 minutes, reduce to 375°F for 35-45 minutes.
- Cool completely before slicing, at least 4 hours.
Notes:
- Keep pastry ingredients cold for flakiest results
- Don’t skip cooling time – filling needs to set properly
- Frozen berries can substitute but may create softer texture
- Store covered at room temperature up to 2 days
Diet Tags
Vegetarian-Friendly: Made with vegetarian ingredients suitable for vegetarian diets
Seasonal Dessert: Celebrates peak blackberry season with fresh, local ingredients
Traditional American: Classic pie representing authentic American baking heritage
Make-Ahead Friendly: Components can be prepared in advance for convenient entertaining
Freezer-Friendly: Freezes well both baked and unbaked for future enjoyment
Comfort Food: Provides nostalgic comfort and satisfaction perfect for family gatherings
Health Benefits
Antioxidant Power: Blackberries are rich in anthocyanins and vitamin C that support immune function and cellular health.
Fiber Content: High fiber from berries supports digestive health and helps maintain stable blood sugar levels.
Vitamin K: Blackberries provide vitamin K important for bone health and proper blood clotting function.
Manganese Source: Essential mineral from berries supports bone development and wound healing processes.
Folate Content: Important B-vitamin from berries supports cellular function and healthy red blood cell formation.
Natural Sweetness: Fresh fruit provides natural sugars along with beneficial nutrients rather than empty calories alone.
Frequently Asked Questions
1. Can I use frozen blackberries instead of fresh?
Yes, you can use frozen blackberries, but don’t thaw them first – add them directly to the sugar mixture while still frozen. You may need to increase the cornstarch by 1 tablespoon since frozen berries release more juice during baking. The texture will be slightly softer than with fresh berries, but the flavor will still be excellent.
2. Why is my pie filling runny even after cooling?
Runny filling usually results from insufficient thickening agent or not cooling completely. Make sure you’re using the full 1/3 cup cornstarch and that the pie has cooled for at least 4 hours – the filling continues to thicken as it cools. If it’s still runny, you can refrigerate overnight, which will help it set further.
3. How do I prevent a soggy bottom crust?
Several techniques help prevent soggy bottom crust: bake on the lowest oven rack for direct bottom heat, pre-bake the bottom crust for 10 minutes before adding filling, or place the pie plate on a preheated baking stone. Also, make sure your oven is fully preheated and don’t overfill the pie with too much liquid filling.
4. Can I make the pie crust ahead of time?
Absolutely! Pie crust actually improves with time. You can make the dough up to 3 days ahead and refrigerate it, or freeze it for up to 3 months. You can also roll it out and place it in the pie pan, then cover and refrigerate overnight. The assembled unbaked pie can also be frozen for up to 1 month.
5. How do I know when the pie is properly done?
The pie is done when the crust is deep golden brown and the filling is bubbling vigorously through the lattice openings or vents. The bubbling should be thick and syrupy, not thin and watery. If you insert a knife into the center, it should come out with thick, glossy filling clinging to it, not thin liquid.
Final Thoughts
This Perfect Homemade Blackberry Pie represents everything wonderful about American baking traditions – the satisfaction of creating something beautiful and delicious from simple, wholesome ingredients, the anticipation built during the baking and cooling process, and the joy of sharing a dessert that embodies the essence of seasonal abundance and homemade comfort.
What makes this recipe particularly special is how it honors the natural beauty and intense flavor of blackberries while providing the technical foundation needed for consistently excellent results. The balance between sweet and tart, the contrast of flaky pastry with jammy fruit filling, and the visual appeal of a golden lattice crust create a dessert that satisfies on every level from taste to presentation.
The therapeutic nature of pie-making shouldn’t be underestimated in our fast-paced world. The meditative process of rolling pastry, arranging berries, and weaving lattice strips provides a connection to slower rhythms and traditional skills that ground us in the pleasure of creating something meaningful with our hands. The anticipation during baking and cooling builds excitement that makes the final enjoyment even more satisfying.
Don’t overlook the social and emotional impact of homemade pie in creating memories and bringing people together. Whether served at summer picnics, holiday gatherings, or casual family dinners, this blackberry pie becomes a focal point that encourages lingering around the table, sharing stories, and savoring both the dessert and the company.
The techniques you’ll master while perfecting this blackberry pie – from pastry handling to fruit preparation to lattice weaving – will serve you well in countless future baking adventures while establishing your reputation as someone who creates genuinely special homemade treats that show care and skill.
Whether you’re continuing a family tradition, starting new baking adventures, or simply wanting to capture the essence of summer in a perfect dessert, this Homemade Blackberry Pie delivers exactly the right combination of technical achievement, seasonal celebration, and pure deliciousness. Give this recipe a try and prepare to experience the deep satisfaction that comes from creating one of America’s most beloved desserts in your own kitchen – I’d love to hear about the memories and moments this perfect pie helps create in your home!