
Creepy Witches’ Finger Pretzels Recipe for Halloween
Introduction
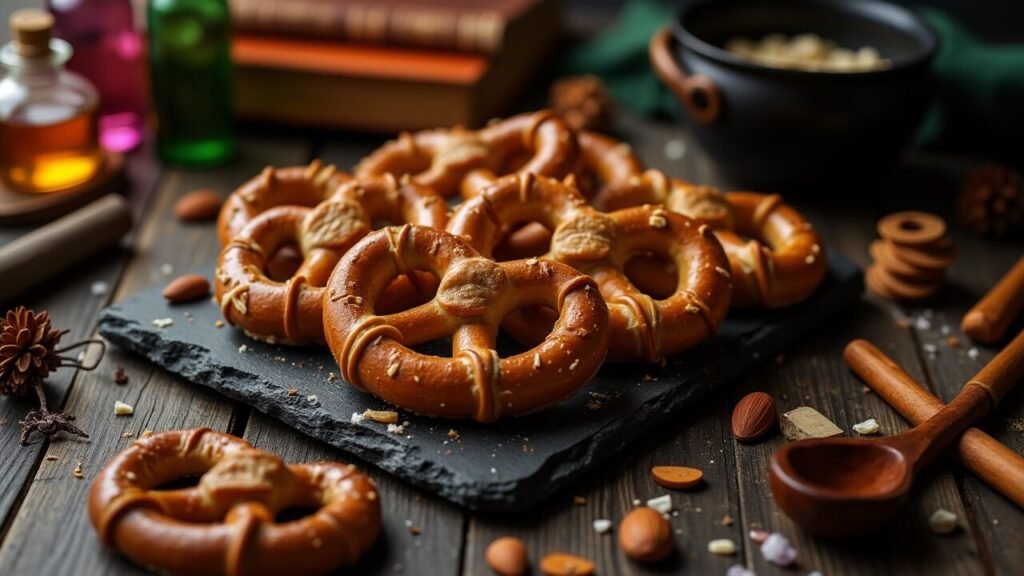
Cast a deliciously dark spell on your Halloween guests with these hauntingly realistic Witches’ Finger Pretzels that transform ordinary pretzel dough into convincingly gnarled witch digits complete with yellowed fingernails and weathered knuckles. These spine-chilling snacks combine the satisfying crunch and salt of traditional pretzels with macabre shaping that creates genuine double-takes from anyone brave enough to reach for these eerily authentic-looking appendages.
What makes these Witches’ Finger Pretzels so effectively unsettling is their incredible attention to anatomical detail – each twisted finger features realistic knuckle indentations, crooked joints, and that distinctive gnarled appearance that suggests centuries of spell-casting and potion-brewing. The almond “fingernails” add the perfect finishing touch that transforms simple pretzel dough into something that looks disturbingly plucked from an actual witch’s hand.
These finger pretzels represent the perfect marriage of technical baking skill and theatrical presentation that elevates Halloween entertaining to genuinely memorable levels. The homemade pretzel base provides superior flavor and texture compared to store-bought alternatives, while the detailed shaping techniques create visual impact that rivals professional haunted attraction props while remaining completely edible and delicious.
The genius of Witches’ Finger Pretzels lies in their ability to serve multiple functions at Halloween gatherings – they work as impressive appetizers, conversation-starting snacks, and even as edible decorations that enhance your overall witch-themed atmosphere. The individual finger format makes them perfect for parties where guests are mingling, while the sturdy pretzel construction ensures they maintain their shape and appeal throughout long celebrations.
In this comprehensive guide, you’ll master the art of creating realistic finger shapes from pretzel dough, learn professional techniques for achieving authentic knuckle textures and weathered appearances, and discover presentation ideas that showcase these witchy digits in appropriately spooky settings. We’ll also cover flavor variations and storage methods that keep your conjured fingers looking their most convincingly creepy.
Ingredients Breakdown
Pretzel Dough Foundation:
Bread Flour (4 cups) – Provides the strong gluten structure needed for shaping and maintaining finger forms during baking. Bread flour creates chewier texture that’s more satisfying than all-purpose flour.
Warm Water (1 1/2 cups) – Activates yeast and hydrates flour for proper dough development. Temperature should be around 110°F for optimal yeast activation.
Active Dry Yeast (2 1/4 teaspoons) – Creates the rise and texture that makes homemade pretzels superior to store-bought versions. Check expiration date for maximum effectiveness.
Sugar (1 tablespoon) – Feeds yeast and adds subtle sweetness that balances salt. Also helps create golden-brown color during baking.
Salt (2 teaspoons) – Essential for flavor development and dough structure. Kosher salt or sea salt work better than table salt for pretzel applications.
Melted Butter (3 tablespoons) – Adds richness and helps create tender texture while contributing to golden color and flavor development.
Witch Finger Realism Elements:
Sliced Almonds (48 pieces) – Creates realistic fingernails when pressed into dough tips. Choose uniform, pointed almonds for most convincing nail appearance.
Whole Almonds (24, sliced lengthwise) – Alternative nail option that provides larger, more dramatic fingernail effects for witches with particularly long claws.
Egg Wash (1 egg + 1 tablespoon water) – Creates glossy, golden-brown finish that resembles aged skin while helping almonds adhere securely.
Coarse Sea Salt (1/4 cup) – Traditional pretzel topping that adds flavor and creates texture that suggests weathered, aged skin.
Baking Soda Bath:
Water (10 cups) – For boiling bath that creates characteristic pretzel crust and authentic texture.
Baking Soda (2/3 cup) – Creates alkaline bath that develops pretzel’s distinctive flavor and creates proper browning during baking.
Authentic Aging Effects:
Paprika (1 teaspoon) – Mixed into egg wash creates aged, weathered skin coloring that makes fingers look more realistic.
Turmeric (1/2 teaspoon) – Adds yellowing effect that suggests ancient, magical fingers with supernatural age.
Cocoa Powder (1 tablespoon) – Dusted over finished pretzels creates dirty, earthy effects that enhance witch theme authentically.
Black Sesame Seeds (2 tablespoons) – Pressed into knuckle areas creates realistic age spots and texture details.
Flavor Enhancement Options:
Garlic Powder (1 teaspoon) – Added to dough creates savory depth that complements witch theme with earthy, mysterious flavors.
Herbs de Provence (1 teaspoon) – Mixed into salt topping adds magical herb essence that fits witch’s garden theme perfectly.
Onion Powder (1/2 teaspoon) – Enhances savory flavor profile and adds complexity that makes fingers more addictive.
Smoked Paprika (1/2 teaspoon) – Creates deeper, more complex flavor while enhancing aged appearance with smoky coloring.
Optional Magical Enhancements:
Food Coloring (green/yellow) – Mixed into egg wash creates supernatural skin tones for otherworldly witch variations.
Edible Glitter (black/gold) – Brushed over finished fingers creates magical sparkle suggesting residual spell energy.
Sesame Seeds (black and white) – Creates varied texture effects and realistic skin imperfections when pressed into dough.
Step-by-Step Instructions
1. Conjure Your Pretzel Dough Base
In large mixing bowl, dissolve yeast and sugar in warm water, allowing to bloom for 5-10 minutes until foamy and active. This step is crucial for proper rise and texture development.
Add bread flour, salt, and melted butter to yeast mixture, stirring until shaggy dough forms. Turn onto floured surface and knead 8-10 minutes until smooth and elastic.
Place dough in greased bowl, cover with damp towel, and rise in warm place for 1 hour until doubled in size. Proper rising ensures light, chewy texture.
2. Shape Your Gnarled Witch Fingers
Punch down risen dough and divide into 24 portions for individual finger shaping. Keep unused portions covered to prevent drying.
Roll each portion into 6-inch long rope, then shape into realistic finger form by creating joints, knuckles, and slight curves that suggest arthritis and age.
Use fingers to create knuckle indentations and joint swellings that make each finger look authentically gnarled and weathered from centuries of spell-casting.
3. Add Realistic Fingernail Details
Press sliced almond firmly into tip of each shaped finger, creating realistic fingernail that’s slightly yellowed and weathered-looking.
Ensure almonds are securely attached by pressing into dough and slightly overlapping dough over almond base for natural nail bed appearance.
Vary almond sizes and angles for natural diversity that suggests individual witch characteristics and nail growth patterns.
4. Create Authentic Knuckle Textures
Use knife tip or skewer to create wrinkles, lines, and texture details in knuckle areas that suggest aged, weathered skin with realistic imperfections.
Add joint swelling by gently pinching dough around knuckle areas, creating the arthritic appearance of ancient hands used for magical workings.
Press black sesame seeds into knuckle creases for age spots and texture details that enhance realism significantly.
5. Prepare the Magical Baking Bath
Bring large pot of water to rolling boil and carefully add baking soda. The mixture will bubble vigorously – this alkaline bath creates authentic pretzel flavor and texture.
Working in batches, gently lower shaped fingers into boiling bath for 30 seconds each. This step is essential for proper pretzel development.
Remove with slotted spoon and place on parchment-lined baking sheets, maintaining finger shapes and spacing for even baking.
6. Apply Aging and Browning Effects
Brush each finger with egg wash mixed with paprika and turmeric for aged, weathered skin coloring that looks convincingly ancient.
Sprinkle with coarse sea salt and any additional texture elements like herbs or seeds while egg wash is still wet for proper adhesion.
Create varied coloring by applying egg wash unevenly, leaving some areas lighter for natural skin tone variation.
7. Bake to Witchy Perfection
Preheat oven to 450°F and bake fingers for 12-15 minutes until deep golden brown and properly set. The high temperature creates proper crust development.
Rotate pans halfway through baking for even browning and authentic pretzel color development across all fingers.
Cool on wire racks until just warm before serving – they’re most delicious when still slightly warm with crispy exterior and chewy interior.
Tips and Variations
Professional Witch Finger Techniques:
Anatomical Accuracy – Study real hand anatomy for convincing finger proportions, joint placement, and natural curvature that makes fingers look genuinely realistic.
Texture Mastery – Use various tools (forks, skewers, knife tips) to create different skin textures that suggest age, wear, and magical use.
Natural Variation – Make each finger unique in length, thickness, and curvature to suggest individual witch characteristics and avoid cookie-cutter appearance.
Color Gradation – Apply egg wash unevenly to create natural skin tone variations that enhance realism and avoid flat, uniform coloring.
Creative Witch Variations:
Ancient Crone Fingers – Use extra aging effects with darker coloring, more pronounced knuckles, and additional texture details for extremely aged appearance.
Swamp Witch Digits – Add green food coloring to egg wash and use moss-like herbs for fingers that suggest bog-dwelling magical practitioners.
Elegant Sorceress – Create longer, more refined finger shapes with sophisticated coloring and minimal aging for high-class magical practitioners.
Goblin Claws – Make shorter, thicker fingers with dramatically long almond nails for more creature-like magical beings.
Flavor Profile Enhancements:
Herb Garden Witch – Mix dried herbs like rosemary, thyme, and sage into salt topping for magical garden flavors that complement witch theme.
Spiced Potion – Add warming spices like cinnamon, nutmeg, and cloves to dough for mysterious, magical flavor complexity.
Savory Spell-Caster – Include garlic, onion powder, and cheese powder for rich, savory fingers that satisfy hearty appetites.
Sweet Enchantress – Light dusting of cinnamon sugar after baking creates sweet magical treats for different audience preferences.
Advanced Shaping Techniques:
Joint Articulation – Create more detailed joint structure with realistic knuckle swelling and finger segment definition.
Nail Bed Realism – Carefully shape dough around almond nails to create authentic cuticle and nail bed appearances.
Skin Imperfections – Add moles, warts, and scars using small dough pieces or seed placement for enhanced character details.
Presentation and Display Ideas:
Witch’s Spell Book – Arrange fingers emerging from old book pages as if they’re ingredients being selected for magical recipes.
Cauldron Collection – Display around mini cauldrons filled with dry ice for smoking effect that suggests recent spell-casting activities.
Serving Suggestions
Witch’s Kitchen Atmosphere:
Magical Ingredient Display – Arrange fingers in apothecary jars labeled with mystical names like “Aged Crone Digits” or “Stirring Fingers, Grade A.”
Spell-Casting Station – Present alongside spell books, crystal balls, and magical implements as if fingers are essential potion ingredients.
Witch’s Pantry – Display in rustic baskets with other magical foods like “toad eyes” (olives) and “spider legs” (pretzel sticks).
Cauldron Buffet – Serve from large black cauldron surrounded by dry ice fog, magical herbs, and flickering candles for authentic witch atmosphere.
Interactive Magical Experiences:
Potion Brewing – Let guests select fingers as ingredients for fictional potion recipes, making eating part of magical roleplay experience.
Witch Finger Identification – Create game where guests must identify which witch each finger belongs to based on character descriptions.
Magic Spell Ingredients – Provide spell recipe cards that call for specific numbers of witch fingers, making serving interactive and themed.
Gothic Halloween Settings:
Haunted Library – Display among old books, candles, and antique magical implements for scholarly witch aesthetic.
Medieval Witch’s Hovel – Present in rustic wooden bowls with rough pottery and primitive magical tools for authentic historical feel.
Modern Witch Apartment – Arrange with contemporary magical elements like crystal collections and modern spell books for updated witch theme.
Complementary Halloween Foods:
Pair with other witch-themed treats like “toad slime” dips, “bat wing” crackers, or “spider egg” cheese balls for complete magical feast.
Educational Opportunities:
Use as starting point for discussions about historical witch persecution, folklore traditions, or modern Wiccan practices in age-appropriate ways.
Storage and Reheating Instructions
Optimal Storage Conditions:
Store Witches’ Finger Pretzels in airtight containers at room temperature for up to 5 days. Layer between parchment paper to prevent almond nails from breaking or sticking together.
Keep containers in cool, dry locations to maintain crispy exterior texture that makes these pretzels most enjoyable to eat.
Maintaining Texture Quality:
If pretzels lose crispness during storage, refresh in 300°F oven for 3-5 minutes to restore exterior crunch while keeping interior chewy.
Allow refreshed pretzels to cool completely before returning to storage containers to prevent condensation that would make them soggy.
Long-Term Storage Options:
Baked pretzels can be frozen for up to 2 months when wrapped individually and stored in freezer-safe containers. Thaw at room temperature before serving.
For best results, freeze pretzels immediately after cooling completely, before any texture degradation begins.
Make-Ahead Strategies:
Complete Preparation – Finished pretzels can be made up to 3 days ahead and stored properly covered for stress-free party preparation.
Dough Preparation – Pretzel dough can be made 1 day ahead and refrigerated, then shaped and baked day of serving for optimal freshness.
Partial Preparation – Shape fingers and freeze on baking sheets, then complete boiling and baking process day of party.
Component Storage:
Shaped Dough – Unbaked shaped fingers can be covered and refrigerated overnight before boiling and baking process.
Egg Wash Mixture – Prepare aging egg wash mixture day ahead and refrigerate covered for consistent coloring application.
Transportation Guidelines:
Pack carefully in rigid containers with padding to protect delicate almond nails and realistic shaping during transport to witch gatherings.
Reheating for Parties:
Warm briefly in low oven just before serving to restore optimal texture and enhance the magical aroma that draws guests to these witchy treats.
Recipe Notes
Critical Success Factors:
Yeast Activity – Ensure yeast is fresh and water temperature is correct (110°F) for proper dough development and texture.
Boiling Bath – Don’t skip the baking soda bath as this creates authentic pretzel flavor and proper exterior texture.
Oven Temperature – High heat (450°F) is essential for proper browning and crust development that makes these pretzels authentic.
Equipment Recommendations:
Large Pot – Essential for baking soda bath that accommodates multiple fingers without overcrowding during boiling process.
Slotted Spoon – For safely removing fingers from boiling bath without damaging delicate shapes or almond attachments.
Sharp Knife – For creating realistic skin textures and detail work that makes fingers look authentically aged and weathered.
Parchment Paper – Prevents sticking and makes removal easier while protecting realistic shapes during baking process.
Timing for Perfect Witch Gathering:
Day Before – Complete all dough preparation and shaping, refrigerate overnight for next-day boiling and baking.
Day of Gathering – Complete boiling, baking, and final presentation 2-4 hours before guests arrive for optimal texture.
During Party – Refresh warmth briefly if needed and replenish displays to maintain maximum magical impact throughout celebration.
Quality Control Standards:
Realistic Proportions – Maintain finger-like proportions and natural curvature for convincing appearance rather than obvious pretzel shapes.
Secure Attachments – Ensure almond nails are firmly attached and won’t fall off during handling or eating.
Even Browning – Achieve consistent golden-brown color that suggests aged skin without over-browning that would affect flavor.
Troubleshooting Common Issues:
Dough Too Sticky – Add flour gradually during kneading until proper consistency is achieved for easy shaping.
Fingers Losing Shape – Work quickly during shaping and don’t over-handle dough to maintain realistic finger forms.
Almonds Falling Off – Press firmly into dough and ensure proper egg wash adhesion before baking process.
Uneven Browning – Rotate pans during baking and ensure even spacing for consistent heat circulation and color development.
Nutrition Information (Per Serving)
| Nutrient | Amount |
|---|---|
| Calories | 135 |
| Total Fat | 3g |
| Saturated Fat | 1g |
| Carbohydrates | 24g |
| Sugar | 2g |
| Fiber | 1g |
| Protein | 5g |
| Sodium | 380mg |
| Cholesterol | 15mg |
| Calcium | 25mg |
| Iron | 2mg |
Nutrition information is an estimate based on 24 finger pretzels and may vary based on specific almond sizes and salt amounts used.
Recipe Card Summary
Course: Snack/Appetizer
Cuisine: American/Halloween
Servings: 24 finger pretzels
Prep Time: 2 hours (including rising time)
Cook Time: 15 minutes
Total Time: 2 hours 15 minutes
Ingredients:
Pretzel Dough:
- 4 cups bread flour
- 1 1/2 cups warm water (110°F)
- 2 1/4 teaspoons active dry yeast
- 1 tablespoon sugar
- 2 teaspoons salt
- 3 tablespoons melted butter
Finger Details:
- 48 sliced almonds (for fingernails)
- 1 egg + 1 tablespoon water (egg wash)
- 1 teaspoon paprika (for aging)
- 1/2 teaspoon turmeric (for yellowing)
- 1/4 cup coarse sea salt
Boiling Bath:
- 10 cups water
- 2/3 cup baking soda
Instructions:
- Dissolve yeast and sugar in warm water, let bloom 5-10 minutes.
- Add flour, salt, and butter, knead 8-10 minutes until smooth.
- Rise in greased bowl 1 hour until doubled.
- Divide into 24 portions, shape into realistic gnarled fingers.
- Press almond “nails” into finger tips, add knuckle details.
- Boil water with baking soda, boil fingers 30 seconds each.
- Brush with spiced egg wash, sprinkle with salt.
- Bake at 450°F for 12-15 minutes until golden brown.
- Cool on wire racks before serving.
Notes:
- Don’t skip the baking soda bath for authentic pretzel texture
- Shape fingers while dough is still warm and pliable
- Store in airtight containers up to 5 days
- Refresh in low oven if texture softens
Diet Tags
Vegetarian-Friendly: Made with vegetarian ingredients suitable for most vegetarian diets
Dairy-Free Option: Can be made dairy-free by substituting plant-based butter in dough
Egg-Free Possible: Egg wash can be replaced with plant milk for vegan-friendly version
Nut Warning: Contains almonds for fingernail effects – provide nut-free alternatives if needed
Freshly Made: Best consumed within 2-3 days of baking for optimal texture and flavor
Interactive Food: Encourages engagement and conversation through realistic appearance
Health Benefits
Complex Carbohydrates: Bread flour provides sustained energy from complex carbohydrates that fuel Halloween activities.
Protein Content: Combination of flour and almonds provides plant-based protein for sustained satiety.
Iron Fortification: Enriched flour contributes iron necessary for healthy blood and energy levels.
Healthy Fats: Almonds provide beneficial monounsaturated fats and vitamin E for heart health.
Social Engagement: Realistic appearance encourages interaction and conversation at Halloween gatherings.
Creative Expression: Making these pretzels provides artistic outlet and stress relief through detailed food crafting.
Frequently Asked Questions
1. Can I make these pretzels without the baking soda bath?
While you can skip it, the baking soda bath is what gives pretzels their distinctive flavor and chewy texture with crispy exterior. Without it, you’ll have finger-shaped bread rolls rather than authentic pretzels. The alkaline bath is what creates the characteristic pretzel taste and proper browning, so I strongly recommend including this step.
2. How do I prevent the almond fingernails from falling off?
Press the almonds firmly into the dough tips when the dough is still slightly warm and pliable. Make sure to push them in deep enough that they’re secure, and brush with egg wash to help them adhere during baking. If some still come loose, you can “glue” them back on with a tiny dab of melted butter or egg wash.
3. Can I make the dough ahead of time?
Yes! You can make the dough up to 24 hours ahead and refrigerate it after the first rise. When ready to use, let it come to room temperature for easier shaping, then proceed with forming fingers, boiling, and baking. The flavor actually improves slightly with overnight fermentation.
4. How do I create the most realistic-looking witch fingers?
Study real hand anatomy for proper proportions and joint placement. Make each finger slightly different in length and curvature, add pronounced knuckles by pinching and shaping the dough, and use tools like knife tips to create wrinkles and age lines. The key is natural variation rather than uniformity.
5. What’s the best way to store these so they stay crispy?
Store completely cooled pretzels in airtight containers at room temperature with parchment paper between layers to protect the almond nails. If they lose crispness, refresh them in a 300°F oven for 3-5 minutes. Avoid refrigerating as this can make them soggy, and never store while still warm as this creates condensation.
Final Thoughts
These Witches’ Finger Pretzels represent the pinnacle of Halloween food artistry, combining serious baking technique with theatrical presentation that creates genuinely memorable experiences for anyone brave enough to bite into these eerily realistic digits. The homemade pretzel base provides superior flavor and texture that elevates these treats far beyond simple novelty items into genuinely delicious snacks that happen to look disturbingly authentic.
What makes these finger pretzels particularly special is their incredible attention to anatomical detail that transforms ordinary pretzel dough into convincing witch appendages. The time invested in creating realistic knuckles, weathered skin textures, and yellowed fingernails pays dividends in the shocked reactions and delighted conversations they inspire at Halloween gatherings.
The technical baking skills you’ll develop while mastering these pretzels – from proper yeast handling to alkaline bath techniques to realistic food shaping – will serve you well in future baking adventures while establishing your reputation as someone who creates truly impressive Halloween treats. The combination of traditional pretzel-making with creative food artistry makes this a rewarding project for serious baking enthusiasts.
Don’t underestimate the social impact these witchy digits will have at your Halloween celebrations. They naturally become conversation starters and photo opportunities that capture the playful horror spirit of the season while providing substantial, satisfying snacking that keeps guests engaged and entertained throughout your gathering.
The make-ahead potential and impressive presentation value make these perfect for hosts who want to create maximum impact with thoughtful preparation. Whether you’re hosting an intimate witch-themed dinner party, contributing to a large Halloween potluck, or creating special treats for Halloween movie night, these finger pretzels deliver exactly the right combination of shock value and delicious satisfaction.
Whether you’re embracing the witch aesthetic for Halloween fun, showcasing your advanced baking skills, or simply wanting to create something memorably spooky that brings people together through shared amazement, these Witches’ Finger Pretzels provide the perfect vehicle for Halloween creativity and deliciousness. Give this recipe a try and prepare to watch as your gnarled creations cast their own spell of delight on everyone who encounters them – I’d love to hear about the creative aging techniques and magical presentations you develop for your own coven of witchy finger treats!
