
Easy Chocolate Marshmallow Pie Recipe – Decadent No-Bake Dessert
Introduction
There’s something absolutely magical about the combination of rich, velvety chocolate and fluffy, cloud-like marshmallows that just makes your heart skip a beat. This Chocolate Marshmallow Pie is everything you’ve ever dreamed of in a dessert and more – it’s indulgent without being overwhelming, elegant enough for special occasions, yet simple enough for a casual weeknight treat.
What makes this pie truly special is how incredibly easy it is to make. We’re talking about a no-bake wonder that comes together in just minutes, requires no special baking skills, and delivers restaurant-quality results every single time. The best part? It’s completely customizable to your taste preferences and dietary needs.
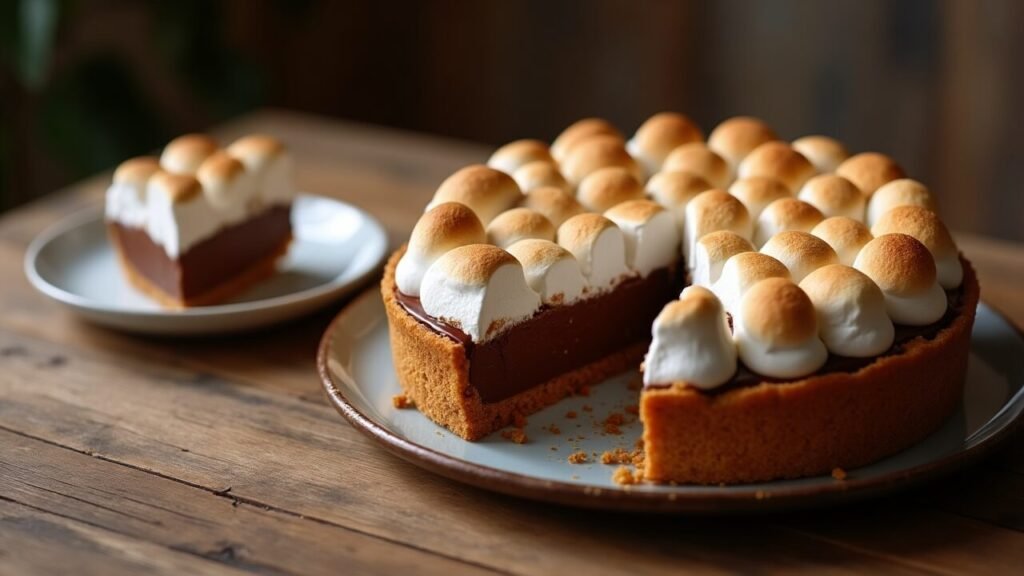
Imagine cutting into a pie with a perfectly crispy graham cracker crust that gives way to a silky smooth chocolate filling, all topped with a layer of golden, toasted marshmallows that practically melt in your mouth. This isn’t just dessert – it’s an experience that will have your family and friends begging for the recipe.
In this comprehensive guide, you’ll learn exactly how to create this show-stopping dessert from start to finish. I’ll walk you through every ingredient, share my best tips for perfect results, and give you plenty of variations so you can make this recipe truly your own. Whether you’re a beginner baker or a seasoned pro, this recipe is designed to give you confidence in the kitchen and amazing results every time.
Ingredients Breakdown
Let’s dive into what makes this pie so incredibly delicious. Each ingredient plays a crucial role in creating the perfect balance of flavors and textures.
For the Graham Cracker Crust:
- 1 1/2 cups graham cracker crumbs – The foundation of our pie. You can buy pre-made crumbs or crush your own graham crackers in a food processor. Crushing your own gives you better control over the texture.
- 1/4 cup granulated sugar – Adds sweetness and helps bind the crust together.
- 6 tablespoons melted butter – The binding agent that holds everything together. Use unsalted butter for best results.
For the Chocolate Filling:
- 8 oz cream cheese, softened – This creates the creamy, rich base. Make sure it’s completely softened to avoid lumps.
- 1/2 cup powdered sugar – Sweetens and helps create that smooth texture we’re after.
- 1/4 cup cocoa powder – Use high-quality unsweetened cocoa powder for the best chocolate flavor.
- 1 teaspoon vanilla extract – Enhances all the other flavors in the filling.
- 1 1/2 cups heavy whipping cream – This gets whipped to create that light, airy texture.
- 1/2 cup semi-sweet chocolate chips, melted and cooled – Adds extra chocolate richness and depth.
For the Marshmallow Topping:
- 3 cups mini marshmallows – These create that signature fluffy top layer.
- 2 tablespoons butter – Helps the marshmallows toast evenly and adds richness.
Common Substitutions:
- Gluten-free option: Use gluten-free graham crackers for the crust
- Dairy-free version: Substitute coconut cream for heavy cream and use dairy-free cream cheese
- Lower sugar option: Use sugar-free powdered sugar and sugar substitute
- Chocolate alternatives: Try dark chocolate chips for a more intense flavor, or white chocolate for a sweeter variation
Step-by-Step Instructions
Step 1: Prepare Your Crust
Start by combining the graham cracker crumbs, sugar, and melted butter in a medium bowl. Mix until the mixture resembles wet sand and holds together when pressed. The key here is making sure every crumb is coated with butter – this ensures your crust will hold its shape and have that perfect crispy texture.
Press the mixture firmly into the bottom and up the sides of a 9-inch pie pan. Use the bottom of a measuring cup to really pack it down evenly. Refrigerate the crust for at least 30 minutes while you prepare the filling. This chilling time is crucial for a sturdy crust that won’t crumble when you slice the pie.
Step 2: Make the Chocolate Filling Base
In a large mixing bowl, beat the softened cream cheese until it’s completely smooth and fluffy – this usually takes about 2-3 minutes with an electric mixer. Gradually add the powdered sugar, beating until well combined. The mixture should be light and airy at this point.
Next, sift in the cocoa powder to avoid any lumps, then add the vanilla extract. Beat everything together until the mixture is uniformly chocolate-colored and smooth. If you notice any lumps, keep beating – they’ll eventually disappear.
Step 3: Incorporate the Melted Chocolate
Make sure your melted chocolate has cooled to room temperature before adding it to the cream cheese mixture. If it’s too warm, it could cause the cream cheese to become grainy. Slowly pour the melted chocolate into the bowl while beating on low speed, then increase to medium speed and beat until fully incorporated.
Step 4: Whip the Cream
In a separate bowl, whip the heavy cream until stiff peaks form. This is essential for creating that light, mousse-like texture in your finished pie. Be careful not to over-whip, as this can make the cream grainy and eventually turn it into butter.
Step 5: Fold Everything Together
Here’s where the magic happens. Using a large spoon or rubber spatula, gently fold about one-third of the whipped cream into the chocolate mixture to lighten it. Then, fold in the remaining whipped cream in two additions, being careful not to deflate the cream. The goal is to maintain as much air as possible while creating a uniform chocolate color.
Step 6: Fill and Chill
Spoon the chocolate filling into your chilled crust, spreading it evenly with an offset spatula or the back of a spoon. The surface should be smooth and level. Cover the pie with plastic wrap, making sure the wrap doesn’t touch the filling surface, and refrigerate for at least 4 hours or overnight. This chilling time allows the filling to set properly and develop the perfect creamy texture.
Step 7: Add the Marshmallow Topping
When you’re ready to serve, preheat your broiler or use a kitchen torch. Arrange the mini marshmallows evenly over the top of the chilled pie, making sure to cover the entire surface. Dot small pieces of butter around the marshmallows.
Place the pie under the broiler for 1-2 minutes, watching carefully, until the marshmallows are golden brown and toasted. If using a kitchen torch, move it in circular motions to evenly toast the marshmallows. Serve immediately while the marshmallows are still warm and gooey.
Tips and Variations
Expert Tips for Perfect Results:
- Always start with room temperature cream cheese to ensure a smooth filling without lumps
- Chill your mixing bowl and beaters for 15 minutes before whipping cream for better results
- Don’t skip the cooling time for melted chocolate – hot chocolate will deflate your whipped cream
- For extra stability, add a tablespoon of powdered sugar to your whipping cream
- Use a kitchen torch for more control when toasting marshmallows
Delicious Variations to Try:
- S’mores Pie: Add a layer of chocolate ganache between the filling and marshmallows, and sprinkle crushed graham crackers on top
- Peanut Butter Twist: Add 1/3 cup of creamy peanut butter to the chocolate filling for a rich peanut butter chocolate combination
- Mint Chocolate Version: Replace vanilla extract with peppermint extract and add a few drops of green food coloring
- Adult Version: Add 2 tablespoons of your favorite liqueur to the chocolate filling
- Extra Decadent: Drizzle melted chocolate over the toasted marshmallows before serving
- Seasonal Twist: Use flavored marshmallows like strawberry or coconut for different flavor profiles
Serving Suggestions
This Chocolate Marshmallow Pie is absolutely stunning on its own, but here are some ways to make it even more special:
Perfect Accompaniments:
- Serve with a dollop of fresh whipped cream or a scoop of vanilla ice cream
- Pair with fresh berries like strawberries or raspberries for a pop of color and tartness
- Offer alongside a warm cup of coffee or hot chocolate for the ultimate comfort dessert experience
- Create a s’mores board with extra graham crackers and chocolate squares
Presentation Ideas:
- Dust the plate with cocoa powder before placing each slice
- Garnish with chocolate shavings or mini chocolate chips
- Add a sprig of fresh mint for color contrast
- Drizzle caramel sauce around the plate for an elegant restaurant-style presentation
Occasion Ideas:
- Perfect for campfire-themed parties or summer gatherings
- Makes an impressive holiday dessert that’s easier than traditional pies
- Great for potluck dinners since it travels well
- Ideal for birthday parties – kids and adults love it equally
Storage and Reheating Instructions
Refrigerator Storage: This pie stores beautifully in the refrigerator for up to 5 days when properly covered. The key is to cover it with plastic wrap or store it in an airtight container to prevent it from absorbing other flavors. The marshmallow topping is best added fresh, so if you’re making this ahead, store the pie without the marshmallows and add them just before serving.
Freezer Storage: You can freeze this pie for up to 3 months, but again, I recommend freezing it without the marshmallow topping. Wrap the pie tightly in plastic wrap, then aluminum foil, and place it in a freezer-safe container. To thaw, move it to the refrigerator and let it thaw overnight. Add the marshmallow topping after thawing.
Serving from Cold: This pie is actually best served chilled, so there’s no need to bring it to room temperature. The cold temperature helps maintain the perfect creamy texture of the filling. If you’ve stored it without marshmallows, simply add them and toast them with a kitchen torch or under the broiler right before serving.
Make-Ahead Tips: The chocolate filling can be made up to 2 days in advance and stored covered in the refrigerator. The crust can be made and pressed into the pan up to 3 days ahead. This makes it perfect for entertaining when you want to spread out the work over several days.
Recipe Notes
Prep-Ahead Friendly: This entire pie can be assembled (minus the marshmallow topping) up to 2 days in advance, making it perfect for stress-free entertaining.
Best Results with Fresh Ingredients: While this recipe is forgiving, using fresh, high-quality ingredients makes a noticeable difference. Freshly opened cream cheese, high-quality cocoa powder, and real vanilla extract all contribute to the final taste.
Equipment Recommendations: A 9-inch pie pan works best for this recipe. If you only have a different size, adjust the ingredient quantities accordingly. A kitchen torch gives you the best control over toasting the marshmallows, but a broiler works fine too.
Texture Tips: The filling should be thick enough to hold its shape but light enough to feel mousse-like. If your filling seems too thin, chill it for an extra hour before serving.
Troubleshooting: If your filling doesn’t set properly, it’s usually because the cream wasn’t whipped to stiff peaks or the chocolate was too warm when added. Next time, ensure your cream forms peaks that hold their shape, and let the chocolate cool completely.
Nutrition Information (Per Serving)
Serves: 8
| Nutrient | Amount per Serving |
|---|---|
| Calories | 485 |
| Total Fat | 32g |
| Saturated Fat | 20g |
| Cholesterol | 95mg |
| Sodium | 285mg |
| Total Carbohydrates | 48g |
| Dietary Fiber | 3g |
| Total Sugars | 42g |
| Added Sugars | 38g |
| Protein | 6g |
| Calcium | 125mg |
| Iron | 2.5mg |
Nutrition information is an estimate and may vary based on specific ingredients used and serving sizes.
Recipe Card Summary
Course: Dessert
Cuisine: American
Servings: 8
Prep Time: 25 minutes
Chill Time: 4 hours
Total Time: 4 hours 25 minutes
Ingredients:
- 1 1/2 cups graham cracker crumbs
- 1/4 cup granulated sugar
- 6 tablespoons melted butter
- 8 oz cream cheese, softened
- 1/2 cup powdered sugar
- 1/4 cup cocoa powder
- 1 teaspoon vanilla extract
- 1 1/2 cups heavy whipping cream
- 1/2 cup semi-sweet chocolate chips, melted and cooled
- 3 cups mini marshmallows
- 2 tablespoons butter
Instructions:
- Mix graham cracker crumbs, sugar, and melted butter; press into pie pan and chill
- Beat cream cheese until smooth; add powdered sugar, cocoa powder, and vanilla
- Fold in cooled melted chocolate
- Whip cream to stiff peaks; fold into chocolate mixture
- Pour into crust and chill 4 hours
- Top with marshmallows and toast before serving
Notes: Can be made 2 days ahead without marshmallow topping. Use kitchen torch for best marshmallow results.
Diet Tags: Vegetarian, Nut-Free (check graham cracker ingredients)
Health Benefits:
- Provides calcium from dairy ingredients
- Contains antioxidants from cocoa
- Offers protein from cream cheese and cream
- Can be modified for various dietary restrictions
Frequently Asked Questions
1. Can I make this pie without a kitchen torch? Absolutely! Your oven’s broiler works perfectly for toasting marshmallows. Just watch carefully as they can go from golden to burned very quickly. Place the pie about 6 inches from the broiler and toast for 1-2 minutes until golden brown.
2. How far in advance can I make this pie? The pie (without marshmallow topping) can be made up to 2 days in advance and stored covered in the refrigerator. Add the marshmallows and toast them just before serving for the best texture and appearance.
3. Can I use regular marshmallows instead of mini marshmallows? Yes, but you’ll need to cut them into smaller pieces for even coverage and better toasting. Mini marshmallows work best because they toast more evenly and create a better visual presentation.
4. What should I do if my chocolate filling is too thick or too thin? If it’s too thick, fold in a little more whipped cream. If it’s too thin, make sure your whipped cream was beaten to stiff peaks, and chill the pie for an extra hour or two to help it set.
5. Can I freeze individual slices? Yes! Wrap individual slices tightly in plastic wrap and freeze for up to 3 months. Thaw in the refrigerator for 2-3 hours before serving. Add fresh toasted marshmallows on top after thawing.
Final Thoughts
Whether you’re looking to impress guests at your next dinner party, create a show-stopping dessert for a special celebration, or simply treat your family to something extraordinary, this Chocolate Marshmallow Pie delivers on every level. The combination of rich chocolate, creamy texture, and those perfectly toasted marshmallows creates a dessert experience that’s both nostalgic and sophisticated.
What I love most about this recipe is how it brings people together. There’s something about that first bite – the way the crispy crust gives way to the silky chocolate filling, topped with those warm, gooey marshmallows – that makes everyone at the table smile. It’s comfort food at its finest, yet elegant enough for any occasion.
The beauty of this recipe lies not just in its incredible taste, but in its versatility and ease. You can make it your own with different variations, prepare it ahead of time for stress-free entertaining, and feel confident that it will turn out perfectly every single time.
I’d love to hear how this recipe works out for you! Did you try any of the variations? What was your family’s reaction? Drop a comment below and let me know. And if you share photos on social media, be sure to tag me – I love seeing your beautiful creations. Happy baking!