
Ghost S’mores Recipe – Spooky Halloween S’mores for Kids & Adults
Introduction
When Halloween meets the classic campfire tradition of s’mores, something absolutely magical happens. These Ghost S’mores take everything we love about the original gooey, chocolatey, graham cracker goodness and add a delightfully spooky twist that’s perfect for October nights. They’re cute enough to make kids giggle with delight, yet nostalgic enough to bring out the inner child in every adult around the fire.
What makes these Ghost S’mores truly special is how they transform a beloved classic into something festive and fun without losing any of that traditional s’mores satisfaction. We’re talking about perfectly toasted marshmallow ghosts with adorable chocolate chip faces, melted between crispy graham crackers with rich chocolate. It’s the kind of treat that creates instant Halloween memories and gives everyone around the campfire something to smile about.
The beauty of this recipe lies in its simplicity and versatility. You can make these over a campfire for that authentic outdoor experience, in your backyard fire pit for a cozy fall evening, or even indoors using your oven broiler when the weather doesn’t cooperate. Plus, they’re a fantastic activity to do with kids who love getting creative with the ghost faces and helping with the assembly.
In this comprehensive guide, you’ll discover how to create the perfect Ghost S’mores from start to finish. I’ll share my secrets for shaping marshmallows into adorable ghosts, getting that perfect golden toast, and assembling them for maximum gooeyness and visual appeal. Whether you’re planning a Halloween party, hosting a fall camping trip, or just want to add some seasonal fun to your s’mores tradition, this recipe delivers both charm and deliciousness every single time.
Ingredients Breakdown
Creating the perfect Ghost S’mores is all about using quality ingredients and understanding how each component contributes to both the flavor and the spooky presentation we’re after.
For the Basic Ghost S’mores:
- 16 large marshmallows – The stars of our spooky show. Choose fresh, fluffy marshmallows for the best shape-holding and toasting results. Avoid mini marshmallows as they’re too small to shape into recognizable ghosts.
- 8 whole graham crackers, broken in half – Creates 16 crackers for sandwiching. Choose high-quality graham crackers with good snap and honey flavor.
- 4 large milk chocolate bars or 8 chocolate rectangles – Use your favorite chocolate bars. Milk chocolate is traditional, but dark chocolate or even white chocolate work beautifully for different flavor profiles.
- Mini chocolate chips – For creating the ghost faces. These work better than regular chocolate chips because they’re perfectly sized for small features.
For Assembly Tools:
- Roasting sticks or skewers – Long enough to keep hands safely away from heat source
- Kitchen shears or clean scissors – For shaping marshmallows if needed
- Small bowl of water – For dampening fingers when shaping marshmallows
Optional Flavor Enhancers:
- Cinnamon graham crackers – Adds warm spice that pairs beautifully with fall flavors
- Pumpkin spice chocolate bars – For extra seasonal flavor
- Orange-tinted white chocolate – Creates a fun Halloween color scheme
- Black gel food coloring – For creating different facial expressions with edible marker
Creative Variations:
- Different ghost expressions: Use various sizes of chocolate chips and different arrangements
- Flavored marshmallows – Try vanilla or strawberry flavored marshmallows for subtle taste differences
- Gourmet chocolate options: Use artisanal chocolate bars with interesting flavors like sea salt or caramel
- Gluten-free option: Use gluten-free graham crackers for those with dietary restrictions
Step-by-Step Instructions
Step 1: Prepare Your Ghost Marshmallows
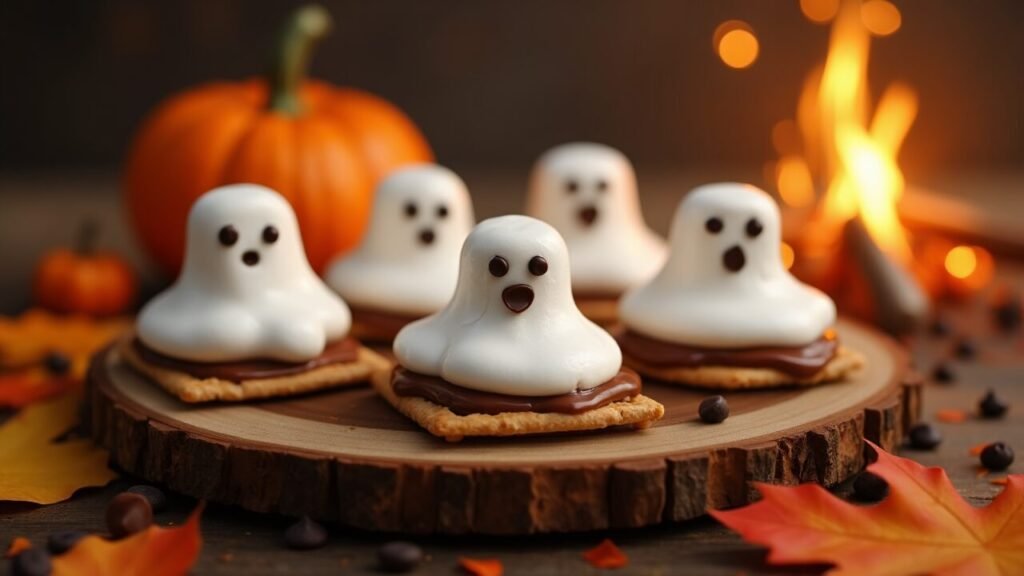
Start by gently shaping your marshmallows into ghost forms. Using clean, slightly damp fingers, gently stretch and mold each marshmallow into a classic ghost shape with a rounded top and a slightly tapered, wavy bottom. Don’t worry about making them perfect – part of the charm is that each ghost has its own personality.
If your marshmallows are particularly sticky, keep a small bowl of water nearby to dampen your fingers as needed. Work gently to avoid tearing the marshmallow surface, as this can affect how evenly they toast later.
Step 2: Create the Ghost Faces
While the marshmallows are still slightly sticky from handling, gently press mini chocolate chips into each ghost to create eyes and mouths. For traditional ghost faces, use two chips for eyes and three to five chips arranged in a small curve for the mouth. Get creative with expressions – surprised ghosts, sleepy ghosts, or even winking ghosts all add personality to your s’mores.
Make sure to press the chocolate chips in firmly enough that they won’t fall out during toasting, but not so hard that you damage the marshmallow structure. The slight stickiness of the marshmallow surface will help hold them in place.
Step 3: Prepare Your Assembly Station
Set up your s’mores assembly area before you start toasting. Break your graham crackers in half and arrange them on a plate or tray. Break your chocolate bars into individual rectangles and place them on half of the graham cracker pieces. This preparation ensures you can work quickly once your ghost marshmallows are perfectly toasted.
If you’re working over a campfire, make sure you have a stable surface nearby for assembly. If you’re using an indoor method, have everything within easy reach of your heat source.
Step 4: Toast Your Ghost Marshmallows
This is where the magic happens! Thread each ghost marshmallow onto a roasting stick, being careful not to push too hard and distort the ghost shape. If using a campfire, find a spot with steady, medium heat rather than aggressive flames – you want even browning, not charring.
Rotate the marshmallow slowly and steadily, allowing each side to develop a beautiful golden-brown color. The goal is to get that perfect balance of crispy exterior and molten interior that makes s’mores so irresistible. This usually takes 2-3 minutes over medium heat.
Step 5: The Perfect Assembly
Working quickly while your ghost marshmallow is still hot and gooey, place it chocolate-side down on the graham cracker with chocolate. The heat from the marshmallow will begin melting the chocolate immediately. Top with the second graham cracker piece and gently press together.
Don’t press too hard initially – you want to give the chocolate time to melt without squishing your ghost completely. Wait about 30 seconds, then give a gentle final press to secure everything together.
Step 6: The Perfect Moment
Here’s the crucial part – let your Ghost S’more rest for about 60-90 seconds before taking that first bite. This allows the chocolate to reach that perfect melty consistency without being so hot it burns your tongue. The marshmallow will still be wonderfully gooey, and all the flavors will have melded together beautifully.
When you do take that first bite, you’ll see why this simple twist on a classic has become such a beloved treat. The combination of textures and the surprise of the cute ghost face makes every bite special.
Tips and Variations
Expert Tips for Perfect Results:
- Use fresh marshmallows for the best shape-holding and toasting results
- Keep ghost marshmallows chilled for 15 minutes before toasting if they’re too soft to handle
- Rotate constantly while toasting to ensure even browning and prevent burning
- Have all components ready before you start toasting – timing is everything
- For indoor toasting, use your oven’s broiler on low setting, watching carefully
Spooky Variations to Try:
- Orange Cream Ghosts: Use orange-tinted white chocolate and vanilla marshmallows
- Chocolate Ghost Bodies: Dip the bottom of white marshmallows in melted dark chocolate before shaping
- Pumpkin Spice S’mores: Use pumpkin spice graham crackers and add a pinch of cinnamon to melted chocolate
- Candy Eyes Version: Use candy eyes instead of chocolate chips for different expressions
- Seasonal Shapes: Try making pumpkin or bat shapes with orange and black marshmallows
- Adult Version: Use dark chocolate with sea salt or add a touch of bourbon flavor
Serving Suggestions
These Ghost S’mores are delightful on their own, but here are some ways to make your Halloween gathering even more memorable:
Campfire Party Ideas:
- Set up a s’mores station with various chocolate options and decorating supplies
- Create a ghost s’mores bar with different marshmallow flavors and face-making materials
- Serve alongside hot apple cider or Halloween-themed hot chocolate
- Set up camping chairs in a circle for the full campfire experience
Indoor Halloween Party Options:
- Use a tabletop fire bowl or fondue pot for controlled indoor toasting
- Create an assembly line with kids helping to make ghost faces
- Serve as part of a larger Halloween dessert spread
- Package individual ghost s’mores as party favors
Presentation Ideas:
- Arrange finished s’mores on a black serving platter for dramatic contrast
- Create a spooky table setting with fake spider webs and mini pumpkins
- Use dry ice in a separate bowl for spooky fog effects (keep away from food)
- Light the area with orange and purple LED candles for ambiance
Themed Serving Options:
- Haunted house parties: Serve with other spooky finger foods
- Fall camping trips: Perfect for cozy October nights outdoors
- School events: Great for Halloween classroom parties
- Family game nights: Fun activity that doubles as dessert
Storage and Reheating Instructions
Immediate Consumption Best: Ghost S’mores are absolutely best enjoyed immediately while the marshmallow is still warm and gooey and the chocolate is perfectly melted. However, there are ways to store and refresh them if needed.
Short-Term Storage: If you need to store assembled s’mores for a short time, wrap them individually in plastic wrap and store at room temperature for up to 4 hours. The graham crackers may soften slightly, but they’ll still be delicious.
Component Storage: For best results, store the components separately if you’re not serving immediately. Keep shaped ghost marshmallows in an airtight container at room temperature for up to 2 days. Store graham crackers and chocolate in their original packaging in a cool, dry place.
Refreshing Methods: If your s’mores have cooled completely, you can refresh them by wrapping in a damp paper towel and microwaving for 10-15 seconds. Alternatively, warm them in a 300°F oven for 2-3 minutes to re-melt the chocolate and soften the marshmallow.
Make-Ahead Tips: You can prepare the ghost-shaped marshmallows with faces up to 24 hours in advance. Store them in a single layer in an airtight container. This actually makes them easier to handle when toasting as they firm up slightly.
Recipe Notes
Heat Source Options: While campfires provide the most authentic experience, these work beautifully over gas fire pits, in fireplace settings, or even using your kitchen’s gas stovetop or broiler. Each method requires slight timing adjustments.
Marshmallow Handling: If marshmallows are too soft to shape easily, chill them in the refrigerator for 15-20 minutes. If they’re too firm, let them come to room temperature or warm them slightly with your hands.
Chocolate Considerations: Different chocolates melt at different rates. Thinner chocolate bars melt faster, while thicker pieces take longer. Adjust your assembly timing accordingly.
Safety First: Always supervise children around fire sources, and use long roasting sticks to keep hands safely away from heat. Have water nearby when working with open flames.
Weather Considerations: Wind can affect toasting evenness and make marshmallows cook unevenly. Find a sheltered spot or create a wind barrier when possible.
Group Activities: This recipe works wonderfully for groups. Set up stations where different people can handle shaping, face-making, and toasting for an efficient and fun group activity.
Nutrition Information (Per Serving)
Serves: 8
| Nutrient | Amount per Serving |
|---|---|
| Calories | 285 |
| Total Fat | 8g |
| Saturated Fat | 5g |
| Cholesterol | 8mg |
| Sodium | 125mg |
| Total Carbohydrates | 52g |
| Dietary Fiber | 1g |
| Total Sugars | 38g |
| Added Sugars | 35g |
| Protein | 3g |
| Calcium | 45mg |
| Iron | 1.8mg |
| Potassium | 95mg |
Nutrition information is an estimate and may vary based on specific brands and chocolate types used.
Recipe Card Summary
Course: Dessert/Treat
Cuisine: American
Servings: 8
Prep Time: 15 minutes
Cook Time: 15 minutes
Total Time: 30 minutes
Ingredients:
- 16 large marshmallows
- 8 graham crackers, broken in half
- 4 milk chocolate bars
- Mini chocolate chips for faces
- Roasting sticks
Instructions:
- Gently shape marshmallows into ghost forms
- Press mini chocolate chips to create faces
- Prepare assembly station with crackers and chocolate
- Thread ghosts on roasting sticks
- Toast over medium heat, rotating constantly
- Assemble immediately with chocolate and crackers
- Let rest 60-90 seconds before eating
Notes: Work quickly during assembly while marshmallow is hot. Can prepare ghost shapes up to 24 hours ahead.
Diet Tags: Vegetarian
Health Benefits:
- Provides quick energy from natural sugars
- Contains small amounts of calcium from chocolate and graham crackers
- Offers social and emotional benefits through shared activity
- Can be portioned for mindful indulgence
Frequently Asked Questions
1. Can I make these indoors without a campfire? Absolutely! You can use your oven’s broiler on low setting, watching carefully and rotating the marshmallows frequently. You can also use a gas stovetop burner with a long skewer, though this requires more attention to safety.
2. How do I keep the chocolate chips from falling off during toasting? Press them firmly into the marshmallow surface when it’s slightly sticky from handling. If they still fall off, you can re-add them immediately after toasting while the marshmallow surface is still soft and warm.
3. What if my marshmallows are too soft to shape? Chill them in the refrigerator for 15-20 minutes to firm them up. Alternatively, you can dust your hands with a tiny bit of powdered sugar to make handling easier, though this may affect the chocolate chip adhesion slightly.
4. Can I use different types of chocolate? Yes! Dark chocolate, white chocolate, or even flavored chocolate bars work wonderfully. Each creates a different flavor profile. Pumpkin spice or cinnamon-flavored chocolates are particularly good for fall and Halloween themes.
5. How do I prevent the marshmallows from catching fire? Keep them over steady, medium heat rather than direct flames. Rotate constantly and pull away from the heat if they start to brown too quickly. If they do catch fire, blow it out gently and continue toasting – a little charring actually adds to the campfire flavor.
Final Thoughts
There’s something absolutely enchanting about combining two beloved traditions – the cozy comfort of campfire s’mores and the playful spirit of Halloween. These Ghost S’mores capture the best of both worlds, creating a treat that’s nostalgic enough to warm your heart and whimsical enough to make you smile with every bite.
What I love most about this recipe is how it brings people together. Whether you’re gathered around a crackling campfire on a crisp October evening, hosting a Halloween party in your backyard, or creating indoor fun on a rainy fall night, these ghost s’mores become the centerpiece of connection and joy. There’s something magical about watching faces light up when they see these adorable marshmallow ghosts, and even more magical about that moment when everyone takes their first gooey, chocolatey bite.
The beauty of Ghost S’mores lies not just in their deliciousness, but in their ability to create memories. Kids will remember the fun of shaping ghosts and choosing facial expressions, while adults will appreciate the clever twist on a classic favorite. It’s the kind of treat that becomes a treasured tradition, something people look forward to every October.
I’d love to hear about your Ghost S’mores adventures! What expressions did your ghosts have? Did you try any of the creative variations? How did your family and friends react when they saw these spooky treats? Share your photos and stories in the comments below – there’s nothing I enjoy more than seeing how you bring these seasonal recipes to life and create your own special memories. Here’s to cozy campfires, Halloween magic, and the sweet joy of s’mores with a spooky twist!