
Homemade Cream Cheese Danish Recipe – Bakery-Style Pastries
Introduction
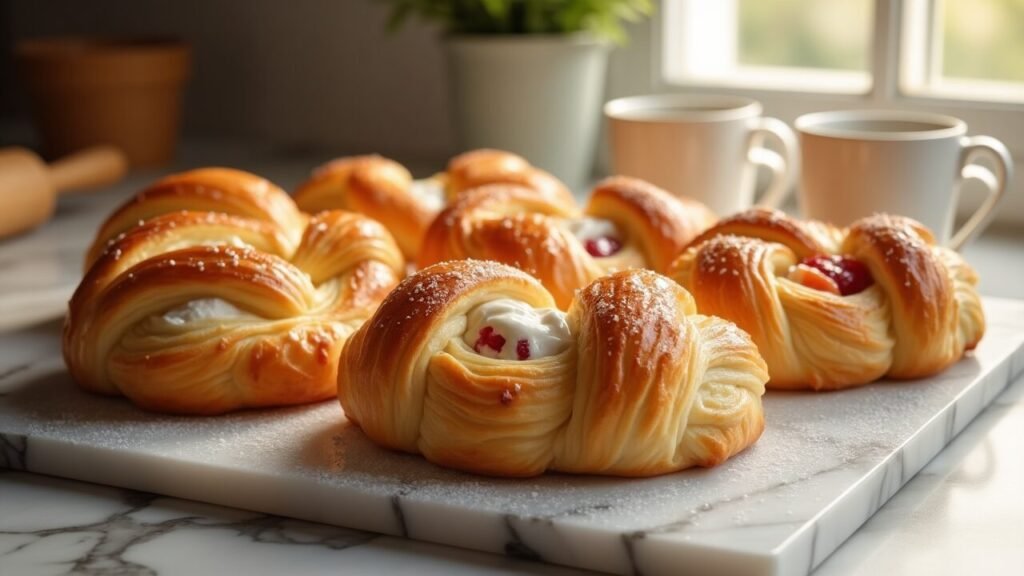
When you want to create something that transforms an ordinary morning into a special occasion, nothing delivers quite like homemade Cream Cheese Danish. These aren’t just pastries – they’re edible works of art that combine the buttery, flaky perfection of laminated dough with rich, tangy cream cheese filling that melts in your mouth and makes every bite feel like pure indulgence.
What makes these Cream Cheese Danish absolutely extraordinary is their perfect marriage of textures and flavors. We’re talking about impossibly light, crispy layers of golden pastry that shatter at first bite, revealing a luscious center of smooth, sweetened cream cheese that provides the perfect counterpoint to the buttery richness. The result is a pastry that’s sophisticated enough for elegant brunches yet comforting enough for cozy weekend mornings.
The beauty of making your own Danish lies in the satisfaction of mastering a truly artisanal technique while using quality ingredients you can control. While the process requires some patience for the laminated dough, the actual hands-on work is quite manageable, and the results rival anything you’d find in the finest European bakeries. Plus, you can customize the fillings and shapes to create your own signature variations.
In this comprehensive guide, you’ll discover how to create bakery-quality Cream Cheese Danish from scratch. I’ll walk you through the traditional lamination process that creates those beautiful flaky layers, share professional techniques for shaping elegant Danish, and provide foolproof methods for creating the perfect cream cheese filling. Whether you’re an experienced baker looking to expand your repertoire or someone ready to tackle an impressive new challenge, this recipe delivers both technical success and incredible flavor.
Ingredients Breakdown
Creating authentic Cream Cheese Danish requires understanding how each component contributes to the final pastry’s texture, flavor, and professional appearance.
For the Danish Dough (Laminated Pastry):
- 3 cups all-purpose flour – Forms the structure of the pastry. Use unbleached flour for the best flavor and color development.
- 1/4 cup granulated sugar – Adds subtle sweetness and helps with browning during baking.
- 1 teaspoon salt – Enhances flavor and strengthens the gluten structure for better lamination.
- 1 packet (2 1/4 teaspoons) active dry yeast – Creates the slight rise that makes Danish tender rather than tough like pure puff pastry.
- 1/2 cup warm milk (110°F) – Hydrates the dough and activates the yeast for proper fermentation.
- 2 large eggs – Provides richness and helps bind the dough while contributing to the golden color.
- 2 tablespoons melted butter – Adds flavor and richness to the base dough.
For the Butter Block (Lamination):
- 1 cup (2 sticks) unsalted butter, cold but pliable – The key to flaky layers. Must be the right consistency for successful lamination.
For the Cream Cheese Filling:
- 8 oz cream cheese, softened – Creates the rich, tangy base that defines these pastries. Must be completely softened for smooth mixing.
- 1/4 cup powdered sugar – Sweetens without adding grittiness that granulated sugar might create.
- 1 large egg yolk – Binds the filling and adds richness while helping it set during baking.
- 1 teaspoon vanilla extract – Enhances and rounds out the cream cheese flavor beautifully.
- 1 tablespoon lemon juice – Adds brightness and prevents the filling from being too heavy.
- Pinch of salt – Balances sweetness and enhances all flavors.
For Assembly and Finishing:
- 1 egg, beaten – For egg wash that creates the beautiful golden, glossy finish.
- 2 tablespoons heavy cream – Mixed with egg wash for extra richness and shine.
Optional Enhancements:
- Fresh berries – Blueberries, raspberries, or sliced strawberries for color and flavor
- Fruit preserves – Apricot, raspberry, or cherry for traditional Danish flavors
- Lemon zest – In the filling for bright citrus notes
- Almond extract – Replace some vanilla for different flavor profile
For Simple Glaze:
- 1 cup powdered sugar – Creates the classic Danish finishing touch
- 2-3 tablespoons milk or cream – Thins the glaze to proper drizzling consistency
- 1/2 teaspoon vanilla extract – Flavors the glaze beautifully
Step-by-Step Instructions
Step 1: Create the Foundation Dough
In a small bowl, dissolve the yeast in warm milk and let stand for 5 minutes until foamy. In a large mixing bowl, whisk together flour, sugar, and salt. Create a well in the center and add the yeast mixture, eggs, and melted butter. Mix until a soft dough forms.
Knead the dough on a lightly floured surface for 5-8 minutes until smooth and elastic. The dough should be soft and slightly tacky but not sticky. Shape into a rectangle, wrap in plastic wrap, and refrigerate for at least 1 hour.
Step 2: Prepare the Butter Block
While the dough chills, prepare your butter for lamination. Place the cold butter between two sheets of parchment paper and pound with a rolling pin until it forms a 6×8 inch rectangle. The butter should be cold but pliable – it should bend without cracking but not be so soft that it melts.
Keep the butter block refrigerated until ready to use. The key to successful lamination is having the dough and butter at similar consistencies.
Step 3: Begin the Lamination Process
On a lightly floured surface, roll the chilled dough into a 10×12 inch rectangle. Place the butter block in the center of the dough and fold the dough over the butter like a letter, sealing the edges completely to encase the butter.
This initial encasing is crucial – make sure there are no air bubbles trapped and that the butter is completely sealed within the dough.
Step 4: Execute the First Turn
Roll the dough gently into a rectangle about 18 inches long, being careful not to let the butter break through. Fold the dough into thirds like a business letter – this is called a “letter fold” or “single turn.” Wrap in plastic and refrigerate for 30 minutes.
The rolling should be gentle but firm, working from the center outward to distribute the butter evenly without breaking through the dough surface.
Step 5: Complete Additional Turns
Repeat the rolling and folding process two more times, chilling for 30 minutes between each turn. After the third turn, wrap the dough and refrigerate for at least 2 hours or overnight. This creates the multiple layers that will become the flaky texture.
Each turn multiplies the layers exponentially, creating the hundreds of thin layers that define great laminated pastry.
Step 6: Prepare the Perfect Filling
Beat the softened cream cheese until completely smooth and fluffy, about 3-4 minutes. Gradually add powdered sugar, beating until well incorporated. Add the egg yolk, vanilla, lemon juice, and salt, beating until the mixture is smooth and pipeable.
The filling should be thick enough to hold its shape but smooth enough to pipe or spread easily. Adjust consistency with a tablespoon of cream if too thick.
Step 7: Shape Your Danish
Roll the chilled dough into a large rectangle about 1/4 inch thick. Cut into squares, rectangles, or your preferred Danish shapes. For classic square Danish, cut 4×4 inch squares and make diagonal cuts from each corner toward the center, leaving the center intact.
Place on parchment-lined baking sheets, leaving space between each pastry for expansion during baking.
Step 8: Fill and Final Shape
Spoon or pipe the cream cheese filling into the center of each shaped pastry. For square Danish, fold alternating flaps over the filling to create the classic pinwheel shape. Press gently to seal and ensure the filling won’t leak during baking.
Let the shaped Danish rise in a warm place for 30-45 minutes until slightly puffed and jiggly when gently shaken.
Step 9: Bake to Golden Perfection
Preheat oven to 375°F (190°C). Brush the risen Danish with egg wash mixed with cream for a beautiful golden finish. Bake for 18-25 minutes until golden brown and cooked through. The pastry should be crispy and the filling should be set but still slightly soft.
Cool on wire racks for at least 10 minutes before glazing. The pastry will continue to crisp as it cools.
Tips and Variations
Expert Tips for Perfect Results:
- Keep dough and butter at similar temperatures for successful lamination
- Don’t rush the chilling periods – they’re essential for workable dough
- Use a light touch when rolling to avoid breaking through dough layers
- Ensure cream cheese is completely softened to prevent lumpy filling
- Egg wash creates the professional golden appearance
Elegant Variations to Try:
- Berry Danish: Top cream cheese filling with fresh blueberries or raspberries
- Apricot Danish: Add apricot preserves alongside or instead of cream cheese filling
- Lemon Danish: Add lemon zest to filling and use lemon glaze
- Almond Danish: Replace vanilla with almond extract and top with sliced almonds
- Chocolate Danish: Add cocoa powder to filling and drizzle with chocolate glaze
- Seasonal Fruit: Top with whatever fruit is in peak season
Serving Suggestions
These elegant Cream Cheese Danish deserve presentation that matches their bakery-quality appearance and flavor:
Classic Breakfast Service:
- Serve warm from the oven with freshly brewed coffee or espresso
- Arrange on white ceramic plates to showcase the golden pastry color
- Dust lightly with powdered sugar for an elegant finishing touch
- Accompany with fresh fruit and premium butter for complete breakfast experience
Brunch Entertaining Ideas:
- Create an elegant pastry spread with various Danish flavors and shapes
- Serve on tiered serving stands for height variation and visual interest
- Pair with champagne or mimosas for special occasion brunches
- Include fresh berries and cream as accompaniments for customization
Afternoon Tea Presentation:
- Cut into smaller portions for dainty afternoon service
- Serve on fine china with proper tea service for elegant presentation
- Arrange with other pastries and finger foods for complete tea experience
- Provide small plates and pastry forks for proper European-style service
Gift and Special Occasion Ideas:
- Package in bakery boxes with parchment paper for homemade gifts
- Create breakfast-in-bed presentations for special celebrations
- Use as centerpieces for holiday morning tables
- Photograph beautifully for social media sharing – they’re incredibly photogenic
Storage and Reheating Instructions
Immediate Storage: Fresh Danish are best enjoyed within 24 hours of baking. Store at room temperature in airtight containers, separating layers with parchment paper to prevent sticking and maintain their shape and texture.
Refrigerated Storage: Due to the cream cheese filling, Danish should be refrigerated if not consumed within a few hours. They’ll stay fresh for up to 3 days when properly stored. Bring to room temperature or warm slightly before serving for best texture.
Freezing Options: Unbaked shaped Danish can be frozen on baking sheets, then transferred to freezer bags for up to 2 months. Bake directly from frozen, adding 5-10 minutes to the baking time. Baked Danish can be frozen for up to 1 month but are best fresh.
Reheating for Best Results: To restore that just-baked texture, reheat Danish in a 325°F oven for 5-8 minutes. Avoid microwaving as it can make the pastry soggy. The goal is to warm through while maintaining the crispy exterior.
Make-Ahead Strategy: The laminated dough can be prepared up to 2 days ahead and refrigerated, or frozen for up to 3 months. Thaw frozen dough overnight in the refrigerator before shaping and filling.
Recipe Notes
Lamination Success: The key to beautiful flaky layers is maintaining proper dough and butter temperature throughout the process. If butter breaks through, chill longer. If it’s too hard, let it soften slightly before continuing.
Butter Quality: Use high-quality European-style butter with higher fat content for the best flavor and lamination results. Lower-quality butter with more water content won’t create as many distinct layers.
Yeast Considerations: The yeast in Danish dough is different from bread – it creates tenderness rather than dramatic rise. Don’t expect the same proofing behavior as traditional bread dough.
Filling Consistency: The cream cheese filling should be thick enough to stay in place during baking but not so thick that it’s difficult to work with. Adjust with cream or powdered sugar as needed.
Temperature Control: Work in a cool kitchen when possible, especially during lamination. Hot environments make the butter too soft and compromise the layering process.
Nutrition Information (Per Serving)
Serves: 12
| Nutrient | Amount per Serving |
|---|---|
| Calories | 285 |
| Total Fat | 18g |
| Saturated Fat | 11g |
| Cholesterol | 95mg |
| Sodium | 245mg |
| Total Carbohydrates | 27g |
| Dietary Fiber | 1g |
| Total Sugars | 8g |
| Added Sugars | 7g |
| Protein | 6g |
| Calcium | 85mg |
| Iron | 1.8mg |
| Potassium | 125mg |
Nutrition information is an estimate and may vary based on specific ingredients used and serving sizes.
Recipe Card Summary
Course: Breakfast/Pastry
Cuisine: Danish/European
Servings: 12
Prep Time: 4 hours (including chilling)
Bake Time: 18-25 minutes
Total Time: 5+ hours
Ingredients:
- 3 cups all-purpose flour
- 1/4 cup granulated sugar
- 1 teaspoon salt
- 1 packet active dry yeast
- 1/2 cup warm milk
- 2 large eggs
- 2 tablespoons melted butter
- 1 cup cold butter for lamination
- 8 oz cream cheese, softened
- 1/4 cup powdered sugar
- 1 egg yolk
- 1 teaspoon vanilla extract
Instructions:
- Make dough with yeast, milk, eggs, and butter; chill 1 hour
- Prepare butter block, encase in dough
- Complete 3 letter folds with 30-minute chills between
- Chill dough 2+ hours or overnight
- Make cream cheese filling
- Roll, shape, and fill Danish
- Rise 30-45 minutes, brush with egg wash
- Bake at 375°F for 18-25 minutes until golden
Notes: Lamination requires patience and proper temperature control. Can be made ahead through shaping stage.
Diet Tags: Vegetarian
Health Benefits:
- Provides protein from eggs and cream cheese
- Contains calcium for bone health
- Good source of B vitamins from enriched flour
- Can be made with whole grain flour for added fiber
Frequently Asked Questions
1. Can I use puff pastry instead of making laminated dough? Yes, high-quality frozen puff pastry can be substituted, though the texture will be slightly different from traditional Danish dough. Thaw according to package directions and proceed with shaping and filling. The yeast in Danish dough creates a more tender result.
2. Why did my butter break through the dough during lamination? This usually happens when the butter and dough are at different temperatures. The butter should be cold but pliable – it should bend without cracking. If it breaks through, chill the dough for 30 minutes and continue more gently.
3. How do I know when my Danish are properly baked? They should be golden brown all over and sound hollow when tapped on the bottom. The cream cheese filling should be set but still slightly soft. Internal temperature should reach 190°F for fully cooked pastry.
4. Can I make these ahead for a special breakfast? Absolutely! Shape and fill the Danish, then cover and refrigerate overnight. Let them come to room temperature and rise for 30-45 minutes before baking. This actually improves flavor development.
5. What’s the best way to reheat leftover Danish? Reheat in a 325°F oven for 5-8 minutes to restore crispness. Avoid the microwave as it makes the pastry soggy. They’re also delicious at room temperature, especially if you add fresh glaze.
Final Thoughts
There’s something truly magical about mastering the art of laminated pastry and creating Danish that rival those from the finest European bakeries. These Cream Cheese Danish represent more than just a breakfast pastry – they’re a testament to the beauty of traditional baking techniques and the satisfaction that comes from creating something truly extraordinary with your own hands.
What makes this recipe particularly rewarding is how it teaches fundamental pastry skills while producing results that never fail to impress. The lamination process might seem daunting at first, but once you understand the principles, you’ll find it’s quite meditative and satisfying. Each fold brings you closer to those beautiful, flaky layers that define great pastry.
These Danish have become some of my most treasured baking projects, perfect for special occasions when you want to show someone how much you care through the time and effort you’ve invested. Whether it’s a holiday morning surprise, a elegant brunch contribution, or simply the desire to fill your kitchen with the incredible aroma of baking pastry, this recipe delivers both technical accomplishment and pure deliciousness.
I’d love to hear about your Danish-making adventures! How did your lamination process go? What fillings and shapes did you create? How did your family and friends react when they saw these bakery-quality pastries? Share your photos and stories in the comments below – there’s nothing I enjoy more than seeing how you master these beautiful techniques and create your own memorable moments. Here’s to the art of pastry making and the joy of creating something truly special from scratch!