
Nothing captures the essence of summer quite like a scoop of perfectly creamy mint chocolate chip ice cream. That first taste brings an instant rush of cool refreshment – the bright, clean mint flavor dancing across your palate while chunks of rich dark chocolate provide delightful textural contrast and bursts of sweetness. This beloved flavor combination has been a favorite for generations, and once you taste homemade mint chocolate chip ice cream, you’ll understand why store-bought versions simply can’t compare.
What makes homemade mint chocolate chip ice cream so special is the incredible depth of flavor you can achieve with real ingredients. Fresh mint leaves create a natural, vibrant taste that’s worlds apart from the artificial mint flavoring found in commercial ice cream. The addition of high-quality chocolate chips – or better yet, chopped chocolate – provides rich, complex chocolate notes that complement the mint beautifully without overwhelming it.
This recipe uses a custard base that creates incredibly rich, smooth ice cream with a luxurious mouthfeel. The technique might seem intimidating at first, but it’s surprisingly straightforward once you understand the basic principles. You’ll learn how to properly infuse cream with fresh mint, create a silky custard base, and achieve the perfect balance of mint and chocolate flavors.
The beauty of making your own ice cream lies in complete control over ingredients and flavors. You can adjust the mint intensity to your preference, choose exactly the type of chocolate you want, and avoid the stabilizers and artificial ingredients found in commercial products. Plus, there’s something deeply satisfying about creating this classic treat from scratch, watching simple ingredients transform into something truly extraordinary through the magic of proper technique and a little patience.
Ingredients Breakdown
Each ingredient in this recipe serves a specific purpose in creating the perfect texture and flavor balance. Understanding their roles helps ensure consistently excellent results.
Heavy Whipping Cream (2 cups): The foundation of rich, creamy ice cream. Heavy cream contains enough fat to create smooth texture and prevent ice crystals from forming. Don’t substitute with lighter creams – the fat content is essential for proper texture. The cream should be very fresh and cold when you start.
Whole Milk (1 cup): Balances the richness of heavy cream while adding body and helping create the proper consistency. Whole milk provides the ideal fat content for smooth scooping – lower-fat milk will result in icier texture. The milk helps thin the base just enough to incorporate other ingredients smoothly.
Granulated Sugar (3/4 cup): Sweetens the ice cream while affecting texture significantly. Sugar prevents ice crystals from forming large chunks, keeping the ice cream smooth and scoopable. The amount here provides balanced sweetness that doesn’t compete with the mint or chocolate flavors.
Large Egg Yolks (6): Create the custard base that gives this ice cream its luxurious richness and smooth texture. The yolks act as natural emulsifiers, binding fat and water together for silky consistency. Use fresh, high-quality eggs and separate them carefully to avoid any white getting into the yolks.
Fresh Mint Leaves (1 cup, packed): The star ingredient that provides authentic mint flavor. Use spearmint or peppermint based on your preference – spearmint is milder and sweeter, while peppermint offers more intensity. The leaves should be fresh, bright green, and aromatic. Avoid dried mint, which lacks the vibrant flavor needed for this recipe.
Vanilla Extract (1 teaspoon): Enhances the overall flavor profile without competing with the mint. Pure vanilla extract provides depth and rounds out the taste. This small amount supports the other flavors rather than standing out on its own.
Salt (1/4 teaspoon): Enhances sweetness and balances flavors while helping to lower the freezing point slightly. This small amount makes all other flavors more pronounced without making the ice cream taste salty.
Dark Chocolate Chips or Chopped Chocolate (3/4 cup): Provides rich chocolate flavor and delightful textural contrast. Mini chocolate chips work well, but chopping your own chocolate from a high-quality bar creates more varied sizes and better flavor. Semi-sweet or dark chocolate works best – milk chocolate can be too sweet and doesn’t provide enough contrast to the mint.
Green Food Coloring (2-3 drops, optional): Creates the traditional pale green color associated with mint chocolate chip ice cream. This is purely aesthetic – the ice cream tastes exactly the same without it. Use gel food coloring for better color control, or omit entirely for a natural cream-colored ice cream.
Step-by-Step Instructions
Step 1: Infuse the Cream with Mint In a heavy-bottomed saucepan, combine the heavy cream, milk, and fresh mint leaves. Heat the mixture over medium heat until it just begins to simmer – small bubbles will form around the edges, but don’t let it boil vigorously. Remove from heat immediately and let steep for 30 minutes to allow the mint flavor to infuse thoroughly. The longer steeping time extracts maximum mint flavor without cooking the leaves.
Step 2: Prepare the Egg Yolk Base While the cream mixture steeps, whisk the egg yolks and sugar in a large bowl until the mixture becomes pale yellow and slightly thickened. This usually takes 2-3 minutes of vigorous whisking. The mixture should fall in ribbons when you lift the whisk – this indicates proper incorporation and helps create smooth custard.
Step 3: Strain and Temper Strain the mint-infused cream through a fine-mesh sieve, pressing the mint leaves to extract as much flavor as possible, then discard the leaves. Slowly pour about half of the warm cream mixture into the egg yolk mixture, whisking constantly to prevent the eggs from scrambling. This tempering process gradually raises the temperature of the eggs safely.
Step 4: Create the Custard Pour the tempered egg mixture back into the saucepan and cook over medium-low heat, stirring constantly with a wooden spoon or heat-proof spatula. Cook until the mixture reaches 170-175°F and coats the back of the spoon – when you run your finger across the spoon, the line should stay clear. This usually takes 5-8 minutes. Don’t let the mixture boil, as this will curdle the eggs.
Step 5: Cool and Add Flavorings Strain the custard through a fine-mesh sieve into a clean bowl to remove any lumps. Stir in the vanilla extract, salt, and food coloring if using. Place the bowl in an ice bath or refrigerate until completely cool, at least 2 hours or preferably overnight. The custard must be thoroughly chilled before churning for the best texture.
Step 6: Churn the Ice Cream Pour the chilled custard into your ice cream maker and churn according to the manufacturer’s instructions, usually 20-25 minutes. The ice cream should have a soft-serve consistency when done. During the last few minutes of churning, add the chocolate chips or chopped chocolate, allowing them to distribute evenly throughout the ice cream.
Step 7: Freeze and Ripen Transfer the churned ice cream to an airtight container, pressing plastic wrap directly onto the surface to prevent ice crystals from forming. Freeze for at least 4 hours or overnight until firm enough to scoop. This ripening process allows flavors to develop and the texture to become perfectly scoopable.
Tips and Variations
Expert Techniques for Success: Temperature control is crucial throughout this process. Use a thermometer when cooking the custard to avoid overcooking the eggs. If you don’t have a thermometer, watch for the mixture to coat the back of a spoon and stay clear when you draw a line through it with your finger.
For more intense mint flavor, increase the steeping time to 45 minutes, but be careful not to let the mixture sit too long as it can become bitter. Taste the strained cream before tempering the eggs – it should have a noticeable but not overwhelming mint flavor.
Flavor Variations: Create chocolate mint ice cream by adding 2 tablespoons of cocoa powder to the sugar before whisking with egg yolks. For peppermint bark flavor, use peppermint extract instead of fresh mint (start with 1/2 teaspoon and adjust to taste) and add crushed peppermint candies along with the chocolate.
Mint chip cookie ice cream works beautifully by folding in crumbled chocolate wafer cookies during the last few minutes of churning. For adults, add a tablespoon of crème de menthe liqueur for extra complexity.
Chocolate Upgrades: Instead of chocolate chips, try chopped dark chocolate bars for more varied textures and richer flavor. Mixing different types of chocolate – dark, milk, and white – creates visual interest and complex flavor layers. For extra indulgence, use chocolate-covered mint candies chopped into small pieces.
Dietary Modifications: For lighter ice cream, replace half the heavy cream with half-and-half, though the texture won’t be quite as rich. Dairy-free versions can use full-fat coconut milk and coconut cream, though the flavor will have subtle coconut notes. Sugar substitutes work, but they may affect texture and freezing properties.
Serving Suggestions
Mint chocolate chip ice cream is delicious on its own, but the right accompaniments can elevate it into something truly special. The cool, refreshing mint flavor pairs beautifully with both complementary and contrasting flavors.
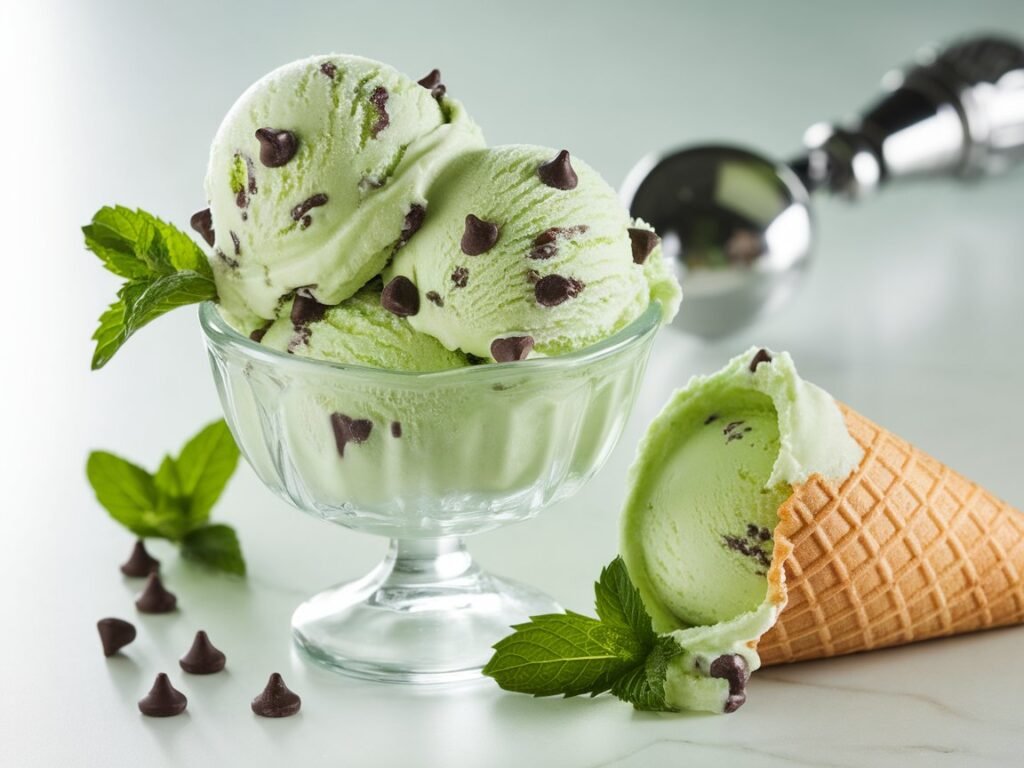
Classic Presentations: Serve in chilled bowls or waffle cones with a sprig of fresh mint as garnish. The visual appeal of the pale green ice cream studded with dark chocolate chunks is part of its charm. For special occasions, serve in elegant glass bowls with a delicate wafer cookie on the side.
Dessert Combinations: This ice cream pairs beautifully with warm desserts – the temperature contrast is delightful. Try it alongside warm brownies, chocolate lava cake, or fruit crumbles. The mint provides a refreshing counterpoint to rich, warm desserts while the chocolate ties the flavors together.
Beverage Pairings: Coffee and mint chocolate chip ice cream create a sophisticated combination – the bitter coffee enhances the chocolate while contrasting beautifully with the cool mint. Hot chocolate with a scoop of this ice cream creates an indulgent treat that’s perfect for special occasions.
For adults, pair with dessert wines, port, or even whiskey-based cocktails. The mint works surprisingly well with bourbon or Irish whiskey in small amounts.
Creative Serving Ideas: Use it to make ice cream sandwiches with chocolate wafer cookies or gingersnaps. Create elegant parfaits by layering the ice cream with chocolate sauce and whipped cream in tall glasses. For summer parties, serve in frozen bowls made from ice and mint leaves for a stunning presentation.
Storage and Reheating Instructions
Proper storage is essential for maintaining the smooth texture and fresh flavor that make homemade ice cream so special. Unlike store-bought ice cream with stabilizers, homemade versions require more careful handling.
Optimal Storage Methods: Store ice cream in shallow, airtight containers rather than deep ones – this allows for easier scooping and more even freezing. Press plastic wrap directly onto the surface of the ice cream before sealing the container to prevent ice crystals from forming. Glass or plastic containers work equally well as long as they seal tightly.
Serving from Storage: Remove ice cream from the freezer 5-10 minutes before serving to allow it to soften slightly for easier scooping. Homemade ice cream freezes harder than commercial versions due to lower overrun (air content) and lack of stabilizers. A warm ice cream scoop or one dipped in warm water makes scooping much easier.
Maintaining Quality: Homemade ice cream is best consumed within 2 weeks for optimal flavor and texture, though it remains safe to eat much longer when properly stored. After extended storage, the texture may become slightly icy, but the flavor remains excellent. Avoid storing ice cream in the freezer door, where temperature fluctuations can cause ice crystals to form.
Preventing Freezer Burn: If you notice ice crystals forming on the surface, scrape them off before serving. To prevent this, always seal containers tightly and minimize air exposure. Using containers sized appropriately for the amount of ice cream helps reduce air space that can lead to ice crystal formation.
Recipe Notes
Equipment Recommendations: An ice cream maker is essential for proper texture – both electric and manual versions work well. If you don’t have an ice cream maker, you can make a no-churn version using whipped cream folded into sweetened condensed milk, though the texture will be different.
A fine-mesh strainer is crucial for achieving smooth custard texture. Use it both when straining the mint-infused cream and the finished custard to ensure no lumps remain.
Timing and Planning: This recipe requires significant inactive time for steeping, cooling, and freezing, so plan accordingly. The custard base can be made up to 2 days ahead and stored in the refrigerator, actually improving in flavor as the mint continues to infuse.
For best results, chill your ice cream maker bowl for at least 24 hours before use if using a frozen-bowl model. Some people keep their bowl in the freezer permanently so it’s always ready for ice cream making.
Ingredient Quality Tips: Fresh mint makes an enormous difference in flavor quality – look for bright green leaves without any brown spots or wilted edges. Different mint varieties provide different flavor profiles, so experiment to find your preference.
High-quality chocolate elevates the final product significantly. Avoid chocolate chips labeled as “baking chips” as they’re designed not to melt and may not incorporate well into the ice cream.
Nutrition Information (Per Serving)
Based on 8 servings
| Nutrient | Amount |
|---|---|
| Calories | 295 |
| Total Fat | 22g |
| Saturated Fat | 13g |
| Cholesterol | 165mg |
| Sodium | 95mg |
| Total Carbohydrates | 22g |
| Dietary Fiber | 1g |
| Total Sugars | 20g |
| Protein | 5g |
| Calcium | 140mg |
| Iron | 1.1mg |
Nutrition information is an estimate and may vary based on specific ingredients used.
Recipe Card Summary
Course: Dessert
Cuisine: American
Servings: 8
Prep Time: 45 minutes
Cook Time: 15 minutes
Chill Time: 2 hours
Churn Time: 25 minutes
Freeze Time: 4 hours
Total Time: 7 hours 25 minutes
Ingredients:
- 2 cups heavy whipping cream
- 1 cup whole milk
- 3/4 cup granulated sugar
- 6 large egg yolks
- 1 cup fresh mint leaves, packed
- 1 teaspoon vanilla extract
- 1/4 teaspoon salt
- 3/4 cup dark chocolate chips or chopped chocolate
- 2-3 drops green food coloring (optional)
Instructions:
- Heat cream, milk, and mint leaves until simmering; steep 30 minutes
- Whisk egg yolks and sugar until pale and thick
- Strain mint from cream; slowly temper into egg mixture
- Cook custard over medium-low heat to 170-175°F, stirring constantly
- Strain custard; add vanilla, salt, and food coloring; chill completely
- Churn in ice cream maker 20-25 minutes; add chocolate chips in final minutes
- Freeze in airtight container 4+ hours until firm
Notes:
- Fresh mint provides best flavor
- Custard must be completely chilled before churning
- Ice cream maker bowl should be frozen 24 hours ahead
- Best consumed within 2 weeks
Diet Tags
Diet Tags: Vegetarian, Gluten-Free, Nut-Free Option, Contains Dairy, Contains Eggs, Refined Sugar, Homemade, No Artificial Flavors
Health Benefits
Health Benefits:
- Fresh Mint: Contains menthol which may aid digestion and provide a cooling sensation
- Dark Chocolate: Rich in antioxidants and flavonoids that support heart health
- Calcium Source: Dairy ingredients provide calcium essential for bone health
- Protein Content: Eggs and dairy contribute complete proteins for muscle maintenance
- Natural Ingredients: Homemade version avoids artificial stabilizers and preservatives
- Portion Control: Rich, satisfying texture means smaller portions are more satisfying
- Mood Enhancement: The combination of chocolate and mint can provide natural mood-lifting benefits
Frequently Asked Questions
1. Can I make this ice cream without an ice cream maker? While an ice cream maker produces the best texture, you can make a no-churn version by whipping 2 cups heavy cream to soft peaks, then folding it into 1 can sweetened condensed milk mixed with mint extract and vanilla. Add chocolate chips and freeze. The texture will be different but still delicious.
2. Why is my ice cream too hard to scoop? Homemade ice cream freezes harder than store-bought because it contains less air and no stabilizers. Remove it from the freezer 5-10 minutes before serving to soften slightly. You can also add 1-2 tablespoons of alcohol to the base, which lowers the freezing point and keeps it softer.
3. Can I use mint extract instead of fresh mint leaves? Yes, but start with just 1/2 teaspoon of mint extract and taste before adding more – it’s much stronger than fresh mint. Add the extract with the vanilla after cooking the custard. The flavor won’t be quite as complex as fresh mint, but it’s still delicious.
4. How do I prevent ice crystals from forming? Ice crystals form when moisture in the air contacts the ice cream surface. Press plastic wrap directly onto the ice cream surface before covering with a lid. Store in the main part of the freezer rather than the door, and consume within 2 weeks for best texture.
5. What’s the best type of chocolate to use? Dark chocolate chips or chopped dark chocolate work best because they provide good contrast to the sweet, minty base. Mini chips distribute more evenly, while chopped chocolate creates more varied textures. Avoid white chocolate or milk chocolate as they can be too sweet and don’t provide enough flavor contrast.
Final Thoughts
Creating homemade mint chocolate chip ice cream is one of those kitchen adventures that reminds you why making things from scratch is so rewarding. The process of infusing fresh cream with mint leaves, carefully crafting a silky custard base, and watching it transform into creamy perfection in your ice cream maker never gets old. Each step builds anticipation for that first perfect spoonful.
What makes this recipe truly special is how it captures the pure essence of mint chocolate chip ice cream without any artificial shortcuts. The fresh mint provides bright, clean flavor that tastes like summer in a bowl, while the rich custard base creates that luxurious texture that makes each bite feel indulgent. The chocolate chips add just the right amount of sweetness and texture contrast to create perfect balance.
The beauty of mastering this recipe extends beyond just having incredible ice cream in your freezer. You’ll develop skills in custard-making, flavor infusion, and temperature control that apply to countless other desserts. Plus, there’s something deeply satisfying about serving homemade ice cream to family and friends – watching their faces light up when they taste the difference that fresh ingredients and careful technique make.
This mint chocolate chip ice cream works beautifully for everything from casual weeknight treats to elegant dinner party desserts. The classic flavor combination appeals to all ages, making it perfect for family gatherings, while the sophisticated preparation method creates results worthy of the finest restaurants.
Whether you’re cooling down on a hot summer day or adding the perfect finishing touch to a special meal, this homemade mint chocolate chip ice cream delivers comfort, refreshment, and pure joy in every single scoop. I’d love to hear about your ice cream-making adventures and any creative variations you discover along the way – share your experiences in the comments below!