
Maple Bacon Milkshake Recipe | Sweet and Savory Treat
1. Introduction
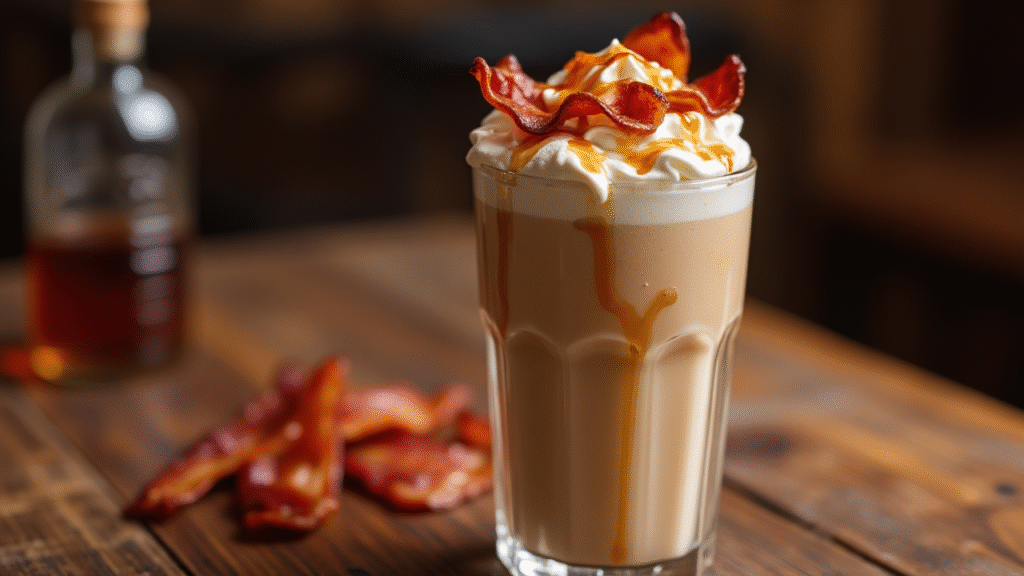
If you’re a fan of sweet and savory flavor combinations, you’re in for a treat! The Maple Bacon Milkshake is a mouthwatering indulgence that blends the creamy goodness of vanilla ice cream with the rich, smoky flavor of crispy bacon. Topped with whipped cream and drizzled with maple syrup, it’s the perfect dessert that’s both decadent and comforting.
This milkshake might sound like an unusual combination at first, but once you taste it, you’ll wonder why it hasn’t been a classic all along. The sweetness of the maple syrup pairs beautifully with the salty bacon, while the vanilla ice cream provides a rich and creamy texture. It’s a perfect dessert for those who enjoy a bit of creativity in their food.
In this post, I’ll show you how to make this indulgent Maple Bacon Milkshake step-by-step. Whether you’re serving it as a fun treat for a special occasion or simply want to try something different, this milkshake is sure to be a hit!
2. Ingredients Breakdown
- Vanilla Ice Cream: Vanilla ice cream serves as the base of this milkshake, providing a creamy, smooth texture. Choose a high-quality vanilla ice cream for the best results. If you’re looking for a dairy-free option, there are plenty of dairy-free vanilla ice creams made from coconut or almond milk.
- Crispy Bacon: The real star of the Maple Bacon Milkshake. Bacon adds a salty, savory crunch that perfectly complements the sweetness of the ice cream and maple syrup. For the best texture, cook the bacon until it’s crispy but not too burnt, and crumble it into small pieces.
- Maple Syrup: Maple syrup adds the signature sweetness to the milkshake. For the best flavor, use pure maple syrup instead of imitation syrup. The real thing has a rich, deep flavor that enhances the overall experience.
- Whole Milk (or Milk of Choice): Whole milk provides a rich, creamy consistency for the milkshake. You can use any milk substitute, such as almond milk, oat milk, or coconut milk, if you prefer a dairy-free option.
- Whipped Cream: The whipped cream on top adds a final touch of sweetness and lightness to the milkshake. You can either use store-bought whipped cream or make your own with heavy cream and a little sugar.
- Optional Garnishes: Extra crispy bacon bits for topping, a drizzle of maple syrup, or a sprinkle of cinnamon to elevate the flavor and presentation.
3. Step-by-Step Instructions
- Cook the Bacon: Start by cooking 3-4 slices of bacon. You can do this in a skillet over medium heat, ensuring the bacon becomes nice and crispy. Once the bacon is cooked, transfer it to a paper towel to drain excess fat. After it cools, crumble the bacon into small pieces and set aside.
- Blend the Milkshake: In a blender, combine 2 cups of vanilla ice cream, 1/4 cup of maple syrup, and 1 cup of whole milk (or milk of your choice). Add about 2 tablespoons of crumbled bacon to the blender, saving the rest for garnish. Blend everything together on high speed for about 30-45 seconds until smooth and creamy.
- Adjust Sweetness: After blending, taste the milkshake. If you prefer it sweeter, feel free to add more maple syrup. Blend again for a few seconds to mix everything evenly.
- Serve the Milkshake: Pour the milkshake into tall glasses. For added flair, drizzle some extra maple syrup on the inside of the glasses before pouring the milkshake in. Top with a generous amount of whipped cream and sprinkle with more bacon bits for texture and flavor.
- Garnish and Enjoy: For the final touch, drizzle some additional maple syrup over the whipped cream, add a slice of bacon on top, and serve immediately. This milkshake is best enjoyed fresh, so dig in right away!
4. Tips and Variations
- Add Extra Creaminess: For a richer texture, add a spoonful of peanut butter or almond butter to the milkshake. This will give the milkshake an extra nutty flavor that complements the bacon beautifully.
- Meat-Free Version: If you’re looking for a vegetarian version, you can substitute the bacon with crispy, caramelized coconut flakes or tempeh bacon for a similar texture and savory flavor without the meat.
- Vegan Option: To make this milkshake vegan, use dairy-free vanilla ice cream and plant-based milk like almond milk or oat milk. You can also swap out the whipped cream for a coconut cream topping for a dairy-free alternative.
- Spicy Kick: If you enjoy a little heat with your sweet, try adding a pinch of cayenne pepper or ground chili flakes into the milkshake for an unexpected, spicy twist.
- Frozen Bacon: For a more indulgent treat, you can freeze small pieces of bacon and use them as a crunchy topping. This will create an extra layer of texture as you sip through the milkshake.
5. Serving Suggestions
- Pair with a Savory Dish: The salty, smoky bacon in this milkshake pairs beautifully with savory dishes. Try serving it alongside a gourmet burger, grilled cheese, or a savory bacon-wrapped chicken breast for the ultimate sweet and savory meal.
- Garnishing Ideas: Besides the crispy bacon, you can add a sprinkle of crushed nuts, such as pecans or walnuts, for extra crunch. A drizzle of caramel sauce can also enhance the sweet flavor and make it extra decadent.
- Perfect for a Themed Dinner Night: This milkshake is a fantastic choice for a fun and quirky dinner night. Pair it with a comfort food-themed meal, like bacon mac and cheese or bacon-wrapped appetizers, for a unique twist on traditional recipes.
6. Storage and Reheating Instructions
Storing Leftovers: While milkshakes are best enjoyed fresh, you can store any leftovers in the freezer for up to 1-2 weeks. Pour the leftover milkshake into a sealed container and freeze. When you’re ready to enjoy it again, let it thaw slightly, then blend with a splash of milk to restore the creamy texture.
Reheating: It’s not recommended to reheat milkshakes, as it can affect the texture. Instead, serve it chilled or frozen for a refreshing experience.
7. Recipe Notes
- Make-Ahead Option: You can cook the bacon ahead of time and store it in the fridge for a few days. That way, when you’re ready to make the milkshake, all you need to do is blend the ingredients together.
- Perfect for Parties: This milkshake is a fun addition to any party or gathering. Serve it in small mason jars or decorative glasses for a unique presentation. Add a paper straw and garnish with a mini piece of bacon for extra flair!
8. Nutrition Information (Per Serving)
| Nutrient | Value per Serving |
| Calories | 450 |
| Fat | 28g |
| Saturated Fat | 9g |
| Carbs | 45g |
| Sugar | 35g |
| Fiber | 2g |
| Protein | 6g |
| Sodium | 350mg |
| Cholesterol | 35mg |
| Calcium | 90mg |
| Iron | 1mg |
Nutrition information is an estimate and may vary based on specific ingredients used.
9. Recipe Card Summary
- Course: Dessert, Beverage
- Cuisine: American
- Servings: 2
- Prep Time: 10 minutes
- Cook Time: 10 minutes (for bacon)
- Total Time: 20 minutes
Ingredients:
- 2 cups vanilla ice cream
- 1/4 cup maple syrup
- 4 slices bacon, cooked and crumbled
- 1 cup whole milk (or any milk of choice)
- Whipped cream for topping
- Extra maple syrup for garnish (optional)
Instructions:
- Cook bacon until crispy, then crumble into small pieces.
- In a blender, combine ice cream, maple syrup, milk, and 2 tablespoons of crumbled bacon.
- Blend until smooth and creamy. Adjust sweetness if needed.
- Pour into glasses, top with whipped cream and the remaining bacon.
- Garnish with extra maple syrup if desired.
Notes: Best enjoyed fresh. Leftovers can be stored in the freezer for up to 2-3 days.
Nutrition Information: See above.
10. Final Thoughts or Conclusion
This Maple Bacon Milkshake is a sweet and savory masterpiece that combines the best of both worlds—rich maple syrup, creamy ice cream, and crispy bacon. It’s indulgent, comforting, and fun to make. Whether you’re enjoying it as a treat after a meal or serving it to guests for a special occasion, it’s sure to be a hit.
I hope you enjoy making and sipping on this unique milkshake! Let me know how it turns out in the comments below, and feel free to share any creative twists you add to the recipe. Cheers to sweet and savory indulgence!
