
Severed Finger Cookies – The Spooky Halloween Treat Everyone Will Talk About
1. Introduction
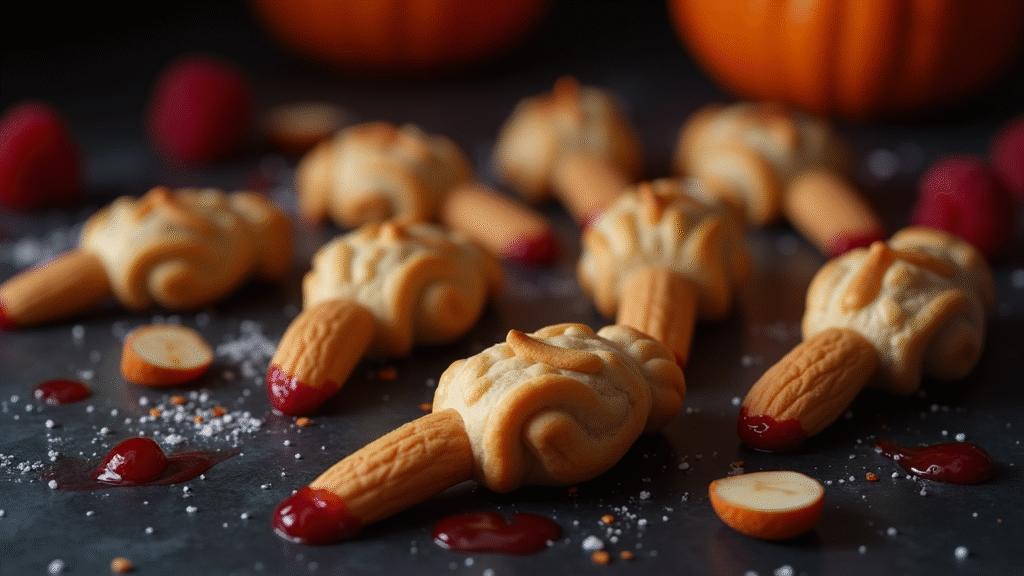
Halloween is the perfect excuse to get creative in the kitchen, and nothing says “spooky” quite like a tray of eerily realistic Severed Finger Cookies. These buttery shortbread cookies aren’t just creepy—they’re incredibly tasty, with a melt-in-your-mouth texture and a sweet almond flavor.
The magic is in the details: almond slices become fingernails, raspberry jam doubles as edible “blood,” and a few simple shaping tricks turn cookie dough into fingers so realistic they’ll make your guests do a double take.
In this recipe, you’ll learn:
- The secret to perfectly shaped finger cookies that hold their form while baking.
- How to create realistic nail beds, wrinkles, and “bloody” ends.
- Simple ingredient swaps for gluten-free or nut-free versions.
Whether you’re hosting a Halloween bash, preparing spooky snacks for school, or just in the mood for a creepy baking project, these cookies will steal the show—right before they get eaten.
2. Ingredients Breakdown
Unsalted Butter (1 cup / 226g)
The base of a buttery shortbread texture. Use room-temperature butter for easy mixing. Salted butter works too, but reduce added salt by half.
Powdered Sugar (1 cup / 120g)
Keeps the texture soft and tender. You can substitute granulated sugar, but powdered sugar gives a smoother bite.
Vanilla Extract (1 tsp)
Adds warmth and flavor. Almond extract is also a great choice for a nuttier taste.
All-Purpose Flour (2 2/3 cups / 320g)
Gives structure to the cookies. For gluten-free, use a 1:1 baking blend.
Baking Powder (1 tsp)
Helps the cookies puff just slightly, maintaining their shape.
Salt (1/4 tsp)
Balances the sweetness.
Almond Slices (whole, not chopped)
These act as fingernails. Blanching optional, but skin-on almonds add more realism.
Raspberry Jam (about 1/4 cup)
For a blood-like appearance. Strawberry or cherry jam can also work.
Optional: Red Food Coloring
To deepen the jam color for a more gory effect.
3. Step-by-Step Instructions
Step 1 – Make the Dough
- In a large mixing bowl, cream the butter and powdered sugar together until light and fluffy.
- Beat in the vanilla extract.
- In a separate bowl, whisk together the flour, baking powder, and salt.
- Gradually add dry ingredients to wet ingredients, mixing just until combined. Cover dough and refrigerate for 30 minutes to firm up.
Step 2 – Shape the Fingers
- Preheat oven to 325°F (165°C). Line a baking sheet with parchment paper.
- Roll tablespoon-sized portions of dough into finger shapes about 3 inches long.
- Pinch slightly at two spots to form knuckles.
- Use a knife to gently score horizontal lines across the knuckle areas.
Step 3 – Add the Nails
- Press an almond slice into one end of each finger to create a nail.
- If desired, brush a little jam under the almond for a “blood” effect.
Step 4 – Bake
- Place shaped fingers on prepared baking sheet.
- Bake for 18–20 minutes, until edges are lightly golden.
- Let cool on the pan for 5 minutes before transferring to a wire rack.
Step 5 – Add the “Blood”
- Warm raspberry jam slightly in the microwave.
- Spoon a little onto the opposite end of each finger, letting it drip for realism.
- For extra effect, brush jam lightly along the nail bed as well.
4. Tips and Variations
For More Realism
- Tint dough slightly with a drop of green or beige food coloring for a lifelike skin tone.
- Use a toothpick to make small “skin cracks.”
Nut-Free Version
- Replace almond nails with pumpkin seeds or fondant cutouts.
Gluten-Free Version
- Use a 1:1 gluten-free baking mix and chill dough slightly longer.
Flavor Twists
- Add cinnamon or pumpkin spice for a seasonal aroma.
- Dip baked fingers halfway in melted chocolate for a “zombie” look.
5. Serving Suggestions
- Arrange cookies on a black platter with extra jam drizzled around for a horror-movie vibe.
- Serve alongside Pumpkin Spice Lattes or Mulled Apple Cider for a cozy-meets-creepy pairing.
- Add to a Halloween dessert table with cupcakes, candy apples, and “eyeball” cake pops.
6. Storage and Reheating Instructions
- Room Temperature: Store in an airtight container for up to 5 days.
- Freezer: Wrap individually in plastic wrap, then freeze for up to 2 months. Thaw at room temperature.
- Reheating: Not typically necessary, but you can warm them briefly in a 300°F (150°C) oven for 2–3 minutes.
7. Recipe Notes
- Can be prepped ahead and shaped fingers can be frozen unbaked; bake from frozen, adding 2–3 extra minutes.
- Best results come from chilling the dough before shaping to prevent spreading.
- Use fine powdered sugar for the smoothest cookie texture.
8. Nutrition Information (Per Cookie)
| Nutrient | Amount |
|---|---|
| Calories | 145 kcal |
| Fat | 8g |
| Saturated Fat | 4.5g |
| Carbs | 17g |
| Sugar | 7g |
| Fiber | 1g |
| Protein | 2g |
| Sodium | 45mg |
| Cholesterol | 20mg |
| Calcium | 10mg |
| Iron | 0.5mg |
Nutrition information is an estimate and may vary based on specific ingredients used.
9. Recipe Card Summary
Course: Dessert
Cuisine: Halloween Treats
Servings: 24 cookies
Prep Time: 40 minutes
Cook Time: 20 minutes
Total Time: 1 hour
Ingredients:
- 1 cup (226g) unsalted butter, softened
- 1 cup (120g) powdered sugar
- 1 tsp vanilla extract
- 2 2/3 cups (320g) all-purpose flour
- 1 tsp baking powder
- 1/4 tsp salt
- 24 almond slices
- 1/4 cup raspberry jam
- Optional: food coloring
Instructions:
- Cream butter and powdered sugar. Mix in vanilla.
- Combine flour, baking powder, and salt; add to wet ingredients. Chill dough 30 minutes.
- Shape dough into fingers, adding knuckle indents and lines.
- Press almond slice into one end for a nail.
- Bake at 325°F (165°C) for 18–20 minutes. Cool slightly.
- Add warmed jam to opposite end for “blood.” Serve.
Notes:
Chill dough for best shape retention. Can be made nut-free with substitutions.
🏷️ Diet Tags: Vegetarian, Nut-Optional, Holiday Treat
🌿 Health Benefits: Small portion size makes it an occasional indulgence; homemade cookies allow control over ingredients.
10. Final Thoughts
Whether you’re hosting a haunted house party or just looking to surprise your family with something spooky, Severed Finger Cookies are the ultimate Halloween baking project. They’re fun to make, incredibly tasty, and almost too creepy to eat—almost.
Give them a try, and don’t forget to share your results. I’d love to hear how you added your own twist—perhaps a zombie green version or chocolate-dipped ends.